Audio Effects
Audio Effects
Renoise and Redux provide a wide range of native effect devices that can be used to alter the input audio in a variety of ways.
Delay Devices
Delay devices repeat an audio signal and mix it with the original sound. By repeating and dampening the sound over and over again, this simulates spatial effects.
Convolver
Note: The Convolver won’t do anything until a file has been loaded. Select a preset to access the bundled files or press the Load button to use your own.
The Convolver applies the sonic character of an impulse response to the input audio by convolution, which is a more complex intertwining of the sounds compared to a simple reverb. An impulse response is typically a recording of an acoustic space's reverberation after an impulse (short sound burst) is played within it. However, impulse responses are not merely limited to reverb and can be created by any method, including just loading in any audio file.
The Reverb, mpReverb and Convolver effects are covered in-depth in our Reverberation video.
- Load/Reload: Pressing the Load button will open up a dialog box where you can load in an audio file to use for convolving. The arrows will automatically load in the previous/next file from the current directory. The reload button will simply reload the current sample.
- Predelay: An initial delay that is applied before any convolution occurs.
- Color: A broad filter used to guide the convolution towards certain frequencies.
- Dry Mix: The gain of the non-convolved input sound.
- Wet Mix: The gain of the convolved signal.
- Impulse: Selecting "Mono" will use only the left channel of the impulse response in order to lower CPU usage.
- Gain: The gain of the impulse response.
- Start: Changes the point in time within the impulse response that convolution will start from.
- Length: Stops the impulse response at a certain point along its length, which is done in a gentle, natural sounding way.
- Resample: Controls the speed at which the impulse response is convolved at, affecting its pitch and length.
Delay
The Delay device is a classic audio effect that creates patterns of spatial echoes from its input, which can be used both creatively and for more practical mixing purposes. It features independently controllable left and right delay channels that can work within two different modes. You may find it useful to watch our video about the Delay & Multitap Delay devices.
- L/R Delay/Offset: In un-synced mode, the sliders directly set the left and right delay lengths in a range from 1 millisecond up to 2 seconds. In Line Sync mode, they positively or negatively offset the delay timing from its automatically selected length.
- L/R Feedback: Controls the amount of diminishing feedback that occurs on each of the delays, altering the number of 'echoes' that are produced. 0% means that the delay will only be heard back once, while at 100% it will keep repeating forever.
- Send: The volume of the source audio that is sent to the delays, where the maximum value of 0db is the same volume as the input sound.
- Line Sync: This switches the mode of the device from the default of 'un-synced' to 'Line Sync'. When un-synced, the Delay sliders can be used to freely set a delay length. In Line Sync mode, the delay lengths are tied to the "Play After Line" values and the sliders change to an Offset percentage.
- Play After Line: The values are the amount of lines in the Pattern Editor that the left and right delay echoes are to be played after. In un-synced mode, a 'Set' button must be clicked to do this, causing the Delay slider to automatically move to the correct delay timing, calculated according to the song’s tempo (BPM and LPB). In Line Sync mode, the Set buttons disappear because the delay timings are always linked to the song’s tempo through the Play After Line values, so changing a value or the BPM/LPB will instantly adjust the delay lengths correctly. However, the delays can be offset from that correct timing with the sliders to the left, whose function has changed in this mode.
- L/R Output Pan: Controls the panning position of the left and right delay outputs.
- Mute Src.: When toggled on, this silences the 'dry' source audio, leaving only the delayed echoes produced by the effect.
Tips and tricks
- Regardless of whether the mode is un-synced or in Line Sync mode, any parameter changes affecting the delay length produce a quick 'scrubbing' sound, simulating a classic 'tape delay' speed change.
- When both the L and R delay lengths are set to the same value, then the panning of the output sound automatically becomes mono (unless the Output Pans are used to create a stereo imbalance).
- Very low delay lengths cause the echoes to merge, allowing you to build stereo-expansion style effects. This can be done with the standard Delay, but the Multitap allows the customising of much more interesting results.
- Sometimes simplistic percussive and melodic input sounds can turn into complex, exciting rhythmic flows by using synchronised delays. Experimenting with different "Play After Line" values can yield interesting results. A common echo rhythm can be created using a 6-beat delay, but other values may be appropriate depending on the input rhythm and sound.
- Output panning can be especially important for stereo inputs when you want to break away from the default, where the left and right channels of a waveform will be kept to those sides. This may not be desirable though, so the Output Pan sliders can be used to place the delay output in a different position from the input. Common uses of this feature include panning the outputs to the center to create a mono echo, or a left/right swap where the echoes appear on the opposite side from the input. Techniques such as this can be very useful to fill out the spatial character of a mix.
Multitap Delay
The Multitap Delay is a more complex version of the regular device, featuring filtering options and four individual 'Taps' that can be fed audio from both the original input sound and the previous Tap. You may find it useful to watch our video about the Delay & Multitap Delay devices.
- L/R Delay/Offset: In un-synced mode, the sliders directly set the left and right delay lengths in a range from 1 millisecond up to 5 seconds. In Line Sync mode, they positively or negatively offset the delay timing from its automatically selected length.
- L/R Feedback: Controls the amount of diminishing feedback that occurs on each of the delays, altering the number of 'echoes' that are produced. 0% means that the delay will only be heard back once, while at 100% it will keep repeating forever. With a negative value the first echo is unaffected, then the waveform is inverted as it is fed back into the device.
- Amount: The volume of the selected Tap's 'wet' delay output.
- No Panic: Clicking the skull button immediately stops the feedback from the Taps.
- Mute Src.: When toggled on, this silences the 'dry' source audio, leaving only the delayed echoes produced by the effect.
- Show/Hide Extra Controls: Clicking the
 arrow button expands/shrinks the device to show/hide the extra controls available for each Tap.
 - Tap 1-4: Swaps between each of the four Taps.
Additional parameters for each Tap are shown by pressing the ![]() "Show/Hide Extra Controls" button:
"Show/Hide Extra Controls" button:
- Line Sync: This switches the mode of the device from the default of 'un-synced' to 'Line Sync'. When un-synced the Delay sliders can be used to freely set a delay length. In Line Sync mode, the delay lengths are tied to the "Play After Line" values and the sliders change to an Offset percentage.
- Play After Line: The values are the amount of lines in the Pattern Editor that the left and right delay echoes are to be played after. In un-synced mode, a 'Set' button must be clicked to do this, causing the Delay slider to automatically move to the correct delay timing, calculated according to the song’s tempo (BPM and LPB). In Line Sync mode, the Set buttons disappear because the delay timings are always linked to the song’s tempo through the Play After Line values, so changing a value or the BPM/LPB will instantly adjust the delay lengths correctly. However, the delays can be offset from that correct timing with the sliders to the left, whose function has changed in this mode.
- Input Source: The volume of the source audio that is used in the selected Tap, where the maximum value of 0db is the same volume as the input sound.
- Input Tap 1-3: (Available on Taps 2-4) How much of the previous Tap's signal is used for this Tap.
- Filter Type: Choose from four different types to filter the Tap: Low/High/Band Pass or Notch.
- Filter Freq.: Sets the cutoff/target frequency for the selected filter type.
- Filter Q: (Available for Band Pass and Notch only) Adjusts the size of the filter’s frequency range.
- Filter Drive: Adjusts the gain of the attenuated frequencies.
- Filter Position: Specifies where the filter is applied in the Tap's signal path.
- Off: Turns the filter off completely.
- Input: Filters the input audio as it’s entering the Tap.
- Feedback: Continually filters the sound each time it is echoed.
- In + Feed: Combines the effects of the Input and Feedback methods.
- Output: Filters the audio leaving the Tap. Since it’s only applied once, you can change the filter settings to affect the feedback non-destructively.
- Output Pan L/R: Controls the panning position of the left and right delay outputs.
- Ping Pong: When toggled on, the left and right feedback delays play as normal for the first echo, but then move to the opposite delay channel, using its length, Feedback and Output Pan settings. As long as Ping Pong is enabled, the audio will keep swapping back and forth like this every time it echoes.
Repeater
This effect captures a small chunk of sound from what is currently playing in a track, then keeps repeating it. You may find it useful to watch our video on this subject.
- Mode Type - Selects the method of repetition:
- Off: Deactivates the repeating.
- Free: Allows for the "Divisor" to be set to any value.
- Even: Repeats the sound exactly once per "Divisor" value.
- Triplet: Repeats the sound at two thirds (67%) the length of the "Divisor" value.
- Dotted: Repeats the sound at one and half times (150%) the length of the "Divisor" value.
- Divisor: The length of the captured sound to be repeated. The value represents this as a fraction of four beats, also know as a Whole Note or Semibreve (with Lines Per Beat at the default value of 4, this is 16 lines of the Pattern Editor).
- Sync: Determines how parameter changes are handled. "Repeats" will implement the change only after the end of the current repetition, while "Lines" updates in sync with the pattern lines (if the current repetition extends past the next line).
- Hold: With this setting off, the "Mode Type" will automatically return to "Off" after the mouse button is released when using the "Grid".
- Grid: Clicking on the grid will change the "Mode" and "Divisor" settings.
Tips and tricks
- Unlike other effects, just inserting a Repeater into a track doesn't automatically affect the audio, because the default Mode is ‘Off’. The effect is activated when a Mode other than ‘Off’ is selected.
- When the settings are changed, it is the sound playing at that exact moment that is captured. So make sure a sound is actually playing when using the Repeater, or only silence will be repeated.
- Hold down the left mouse button on the "Grid" and move the mouse around. This will automatically change the "Mode" and "Divisor" settings and is especially useful on the "Free" section at the top.
- Using the right mouse button, you can record changes made via the grid directly to the Pattern Editor.
Reverb
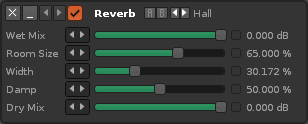
The standard Reverb device is very straightforward and highly efficient. The reverberation is created from a mono-mixed version of the input. The Reverb, mpReverb and Convolver effects are covered in-depth in our Reverberation video.
- Wet Mix: The gain of the reverberated signal.
- Room Size: The size of the acoustic environment, with larger values creating a longer reverberation.
- Width: The width of the reverberated stereo signal. 0 = mono, 100 = full stereo.
- Damp: Filters higher frequencies, simulating the environment’s sound absorption levels.
- Dry Mix: The gain of the non-reverberated input sound.
mpReverb
A complex reverberation effect with many parameters to modify the sound, and a more realistic sounding simulation.
- Duration: The reverberation time in milliseconds.
- Predelay: An initial delay that is applied before any reverberation occurs.
- Low Cut: The cut-off frequency of the dampening filter.
- Low Gain: The gain of the dampening filter. Lower values create more dampened sounds.
- Color: Used to attenuate or boost mid-range frequencies of the reverberated signal, in order to simulate walls.
- Width: Controls the stereo separation of the reverberated signal.
- Pan: The panning of the reverberated signal.
- Wet Mix: The gain of the reverberated signal.
- Dry Mix: The gain of the non-reverberated input sound.
Dynamics Devices
These devices are used to dynamically change the amplitude of an audio signal. The Compressor, Bus Compressor and Gate are able to be used as a Receiver for the #Sidechain device.
Compressor
A Compressor 'squashes' the volume of an audio signal while it is above a specific Threshold level, reducing its dynamic range. Generally speaking, the compression level Attacks when the volume increases and Releases when it falls. The extra headroom provided by compression allows the signal to be boosted in volume after compression, resulting in a 'fattening' of the sound. You may find it useful to watch our Compression video.
- Threshold: The minimum volume level at which the compression will take place.
- Ratio: The strength of the compression.
- Attack: The speed that compression is pushed towards its maximum.
- Release: The speed that compression is reduced, with the aim of removing it completely.
- Makeup: A volume adjustment that is applied to the output.
Bus Compressor
Unlike the normal Compressor, the Bus Compressor doesn't merely react to the incoming signal. A short delay is introduced so that the future behaviour of the input waveform can be analysed. This allows the appropriate action to be taken for adaptive compression. Short peaks are handled via a feed-back algorithm, while constant signals use a feed-forward algorithm. You may find it useful to watch our Compression and Mastering Devices videos.
- Threshold: The minimum volume level at which the compression will take place.
- Ratio: The strength of the compression.
- Attack: The speed that compression is pushed towards its maximum.
- Release: The speed that compression is reduced, with the aim of removing it completely.
- Makeup: A volume adjustment that is applied to the output.
- Knee: Controls how the gradually the compression is applied around the Threshold point, as shown in the graphical representation underneath. Allows for a softer, more natural sounding compression compared to the regular Compressor.
Gate
A Gate reduces the volume of an input signal unless it exceeds a specific Threshold. When it does, the Gate 'opens' allowing the original audio to be heard at its full volume. For example, this can be used to silence a constant low noise floor, or to reduce the low volume parts of a complex waveform (such as drum loops). With the input filters you can target a specific frequency range to control the gating without filtering the output. The 'Duck' option reverses the behaviour of the Gate. You may find it useful to watch our Gate video.
- Threshold: The minimum dB value at which the input signal will open the Gate.
- Attack: The time it takes the Gate to react to the signal breaching the Threshold.
- Hold: Determines how long the Gate will be held open after the signal has fallen below the Threshold, delaying the Release phase.
- Release: The time it takes for the Gate to fully close again after the signal falls below the Threshold. Longer Release times will result in slower fade-outs.
- Floor: The amount of volume reduction applied to the gated audio. Setting this to the minimum value will silence it completely.
- Env. Input: Click to listen to the input after it has been affected by the High and Low Pass filters. Useful to hear exactly what frequency range will control the Gate.
- High/Low Pass: The frequency of the High/Low Pass filter applied to the input. The output signal is not affected by the filters.
- Gate/Duck: Duck mode reverses the behaviour of the Gate, applying the Floor value to the audio while it is above the Threshold.
- Mono/Stereo: Toggle the gating of stereo channels equally or individually.
Maximizer
The Maximizer is a hard limiter which can boost and then clamp an audio signal. The waveform will be limited to the Threshold level when this is exceeded, but the waveform will then have its shape softened when the volume falls back under that Threshold. The Maximizer is often used as the final device in a mastering effects chain to block any stray, unwanted peaks without the harsh sound of hard-clipping. Check it out in our Mastering Devices video.
- Boost: Volume gain applied to the input signal.
- Threshold: The dB value that the Maximizer limits the audio volume to.
- Peak Rel.: Timing for soft-releasing fast peaks (transients) that breached the Threshold.
- Slow Rel.: Timing for soft-releasing slow non-transients that breached the Threshold.
- Ceiling: Final volume gain applied to the output signal.
The small red LED below the VU meters indicates when the Peak Rel. factor is being used.
Filter Devices
Audio filters manipulate the frequency spectrum, sometimes for functional, mixing purposes and sometimes for purely artistic reasons. The EQ devices tend to use filtering for the former, while the Comb Filter concentrates on the latter. The Analog and Digital Filters can do a bit of both.
Analog Filter
An analog style filter featuring zero delay feedback filters with character (saturation, non-linearities) and optional oversampling (2x by default). Both the Analog & Digital Filters are covered in this video.
The available filter models are:
- 2P K35: A 2 pole 12dB low pass, 6dB high pass filter with an extra pole on the feedback path.
- 2P Moog: A 12dB transistor ladder filter with a very unique sound and resonance near to self-oscillation.
- 4P Moog: A 24dB version of the 2P Moog filter.
- 4P Diode: A 4 pole 24bB low pass diode ladder filter, with high pass filtered feedback path.
There are three types of filtering:
- Low Pass: Passes low frequency signals but attenuates frequencies higher than the Cutoff value.
- Band Pass: Passes frequencies within a certain range and attenuates frequencies outside of that range.
- High Pass: Passes high frequency signals but attenuates signals lower than the Cutoff value.
Each filter type has five parameters:
- Cutoff: The target frequency for filtering.
- Resonance: Creates a ringing feedback loop for frequencies around the Cutoff value.
- Inertia: Determines how fast parameter changes are applied. Low Inertia will create sweeping effects by noticeably sliding from one parameter setting to another. This can be useful to soften the effect of Cutoff changes applied to sounds with mostly low frequencies.
- Drive: The strength of saturation that’s applied to the audio as part of the filtering process.
- Oversampling: Oversampling can be useful to stabilise the filter at high frequencies and reduce possible aliasing introduced by saturation. Note that an oversampling factor of n also requires n times more CPU usage.
Comb Filter
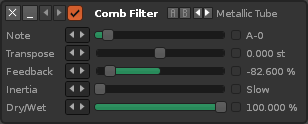
The Comb Filter gets its name from the series of regularly spaced notches in the frequency spectrum that it uses to affect the audio. These notches are generated by adding a delayed version of the input signal to itself, causing constructive and destructive interference.
You may find it useful to watch our video on the Comb Filter and Ringmod effects.
- Note & Transpose: Changes the character of the comb, 'tuning' it to produce precise note values.
- Feedback: Amount of output audio fed back into the device. Values below zero use a negative version of the waveform.
- Inertia: Determines how fast parameter changes are applied. Lower values create sweeping effects, noticeably sliding from the old parameter setting towards the new one.
- Dry/Wet: Ratio of the clean and modulated signals, as a percentage.
Digital Filter
A digital filter with optional oversampling (2x by default). Compared to the Analog Filter this behaves in a stricter, cleaner fashion. Both the Analog & Digital Filters are covered in this video.
The available filter models are:
- Biquad: A standard, precise and fast 2 pole (biquad) filter.
- Butterworth 4n: A fourth order Butterworth filter. Butterworth filters are designed to have a frequency response which is as flat as mathematically possible in the passband, precisely cutting off frequencies.
- Butterworth 8n: An eighth order Butterworth filter, which has an even flatter frequency response than the fourth order version.
- Chebyshev 4n: A fourth order Chebyshev filter with customizable ripple.
- Chebyshev 8n: An eighth order Chebyshev filter with customizable ripple.
Each model has four types of filtering:
- Low Pass: Passes low frequency signals but attenuates frequencies higher than the Cutoff value.
- Band Pass: Passes frequencies within a certain range and attenuates frequencies outside of that range.
- Band Reject: Passes most frequencies unaltered but attenuates those in a specific range to very low levels.
- High Pass: Passes high frequency signals but attenuates signals lower than the Cutoff value.
Each filter type has up to five parameters:
- Cutoff: Sets the target frequency for filtering.
- Resonance/Q: In Low or High Pass filters, this creates a ringing feedback loop for frequencies around the Cutoff value. In Band Pass or Reject filters, this adjusts the attenuation range.
- Ripple: Adjusts the gain of the ripples in a Chebyshev filter.
- Inertia: Determines how fast parameter changes are applied. Low Inertia will create sweeping effects by noticeably sliding from one parameter setting to another. This can be useful to soften the effect of Cutoff changes applied to sounds with mostly low frequencies.
- Oversampling: Oversampling can be useful to stabilise the filter at high frequencies and reduce possible aliasing introduced by saturation. Note that an oversampling factor of n also requires n times more CPU usage.
EQ 5 & 10
EQ 5 is an equalizer which can amplify or attenuate up to five separate frequency bands. The EQ 10 device functions identically to EQ 5, but is even more customisable since it has double the amount of frequency bands and Q parameters. There are three display modes available and you can switch between them using the menu at the top-right of the devices. You may find it useful to watch our video on Equalization, which covers these two devices and the Mixer EQ.
Control Styles
The style of controls can be changed with the drop-down menu at the top-right. In "Graph Only", each band can be changed by click-dragging the points around with the left mouse button. Click-dragging up and down with the right mouse button will change the Q, which adjusts the width of the frequency band. Holding down the "Left Ctrl/Cmnd" key allows for more fine-tuned adjustments. Holding "Left Shift" will lock changes to the volume level only, while holding "Left Alt" will lock changes to the frequency.
The "Sliders Only" style uses sliders to adjust the volume level of the target frequency. This frequency can be changed at the left of the slider, while the Q (frequency band width) can be changed at the right. The "Full Display" mode shows both the sliders and the graph.
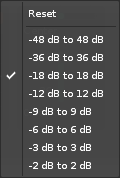
When the graph is visible, its volume scale, as shown along its left side, can be changed by clicking on the small button ![]() in the bottom-right corner. You can also completely reset the effect here.
in the bottom-right corner. You can also completely reset the effect here.
Stereo Field Application
Along the right side of the effect are a set of buttons for choosing how the EQ is processed in the stereo field. 'LR' is the default, which applies the EQ to both the left and right channels equally. The separate 'L' and 'R' modes will apply the EQ to either the left or right channels only. This can be useful by itself, but also provides the opportunity to use two devices to EQ each side in different ways.
The most common version of this though is to mirror the values, which is why the '+-' mode allows you to do this with a single device. The EQ is applied normally on the left channel and inversely on the right channel. With well chosen frequency bands this can help give an instrument its own unique space in the mix. It can also create some interesting spatial effects, especially when automated.
The 'M' and 'S' options will apply the EQ to only the Mid or Side channels. The Side option will do nothing if the input is mono.
Exciter
The Exciter enhances a signal through use of dynamic equalization, phase manipulation, harmonic frequency synthesis and the addition of subtle harmonic distortion. It is traditionally used as a mastering device for adding clarity and width to a mix. Check it out in our Mastering Devices video.
- Band Selector: Choose from High, Mid and Low frequency bands, each with its own separate set of parameters. The two value boxes underneath the graph allow you to alter the frequency band values. Clicking and dragging on the vertical lines within the graph will also do this.
- Band Mode: Choose from "Stereo", which affects both Left and Right channels equally, or "Mid & Side", which allows you to independently affect the mid and side channels of the mix.
- (Mid/Side) Sharpness: Increasing this value will weigh the effect more to the higher frequencies of the selected band.
- (Mid/Side) Amount: The general strength of the effect.
Mixer EQ
The Mixer EQ is a standard equalizer that has been designed to sound and behave like a common DJ mixer, with an emphasis on ease of use. You may find it useful to watch our video on Equalization, which covers the Mixer EQ and the EQ 5 & 10 devices.
- Low Gain: The volume gain applied broadly to lower frequencies.
- Mid Gain: The volume gain applied to the 'Mid Freq.' frequency.
- Mid Freq.: The target frequency for the 'Mid Gain' parameter. Useful for automating to create mid-range filter sweeps.
- Mid Q: The width of the frequency band around the 'Mid Freq.' target.
- Hi Gain: The volume gain applied broadly to the higher frequencies.
- L/R/L+R: The separate 'L' and 'R' modes will apply the changes to either the left or right channels only, while 'L+R' applies the changes to both channels equally.
 - The volume scale of the graph, as shown along its left side, can be changed by clicking on the small button in the bottom-right corner. You can also completely reset the effect here.
Modulation Devices
Modulation Device use controllable oscillators to change certain characteristics of the input waveform. The Chorus, Flanger and Phaser effects have a lot of similarities, both in their parameters and in how modulation is used to alter the audio. With the Reset button they also share one powerful method of controlling the modulation. You may find it useful to watch our video about these three devices.
Chorus
The Chorus effect enriches the original sound by layering on differently pitched duplicates of itself. This can be especially useful for providing warmth and depth to simple wave shapes, as well as the usual vocal enhancements.
- Rate: Frequency of the applied modulation.
- Depth: The upper limit of the modulation's amplitude.
- Feedback: Amount of output audio fed back into the device. Values below zero use a negative version of the waveform.
- Delay: Delay before the modulated signal is applied.
- Dry/Wet: Ratio of the clean and modulated signals, as a percentage.
- Phase: Horizontal phase offset of the modulation. Only applied to the right channel, creating stereo separation.
- Reset: Resets the position of the modulation back to the beginning. Renoise Pattern Editor only: See below for more details on syncing modulation.
- Filter Type: Type of filter that is applied to the modulated signal.
- Filter Options 1-3: Additional parameters that will change depending on the type of filter used.
Flanger
The Flanger mixes two identical signals together, with one of them delayed by a small and gradually changing amount. Mild settings can help to bulk up a sound, while larger values lead to the familiar ‘wandering’ effect.
- Amount: Modulated signal volume. Negative values will invert the signal.
- Rate: Frequency of the applied modulation.
- Amplitude: The upper limit of the modulation's amplitude.
- Feedback: Amount of output audio fed back into the device. Values below zero use a negative version of the waveform.
- Delay: Delay before the modulated signal is applied.
- Phase: Horizontal phase offset of the modulation. Only applied to the right channel, creating stereo separation.
- Reset: Resets the position of the modulation back to the beginning. Renoise Pattern Editor only: See below for more details on syncing modulation.
- Filter Type: Type of filter that is applied to the modulated signal.
- Filter Options 1-3: Additional parameters that will change depending on the type of filter used.
Phaser
The Phaser focuses on EQ, using a series of filters to insert peaks and troughs in the frequency spectrum. The positions of these peaks and troughs are modulated to vary over time, creating a sweeping sound.
- Floor: Lower frequency boundary of the filter modulation.
- Ceiling: Upper frequency boundary of the filter modulation.
- Rate: Frequency of the applied modulation.
- Feedback: Amount of output audio fed back into the device. Values below zero use a negative version of the waveform.
- Depth: The upper limit of the modulation's amplitude.
- Phase: Horizontal phase offset of the modulation. Only applied to the right channel, creating stereo separation.
- Reset: Resets the position of the modulation back to the beginning. Renoise Pattern Editor only: See below for more details on syncing modulation.
- Stages: Number of filters applied. The more filters, the stronger the effect.
Syncing Modulation
The modulation runs constantly, even while the song is stopped, so to synchronise the modulation's cycle to the song's playback, which will ensure it runs the same way each time, you have to automate the "Reset" button. This is achieved by right-clicking on it, which places a command in the current track's Master FX column, and can be done while the song is stopped or during playback (this is for track effects, sample fx need to be automated through macros). You can also control the position of the reset by manually entering the effect command: x7yy, where x stands for the location of the device in the effect chain (1 if it's the first device, 2 if it's the second etc.) and yy is the offset value. For example, if yy is equal to:
- 00 - The modulation restarts from the beginning.
- 40 - The modulation restarts from a quarter of the way through the cycle.
- 80 - The modulation restarts from halfway through the cycle.
- C0 - The modulation restarts from three quarters of the way through the cycle.
- FF - The modulation restarts from just before the end.
Ringmod
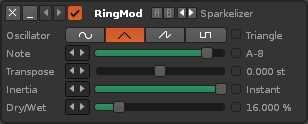
Ring modulation simply takes the incoming audio signal and multiplies it by an oscillating waveform, chosen from the four different shapes provided by the device. Low frequency oscillations will just modulate the volume of the signal, while higher frequencies will generate new tones and harmonics.
You may find it useful to watch our video on the Ringmod and Comb Filter effects.
- Oscillator: The shape of the oscillator waveform that is applied.
- Note & Transpose: The frequency of the oscillator. The parameters allow you to 'tune' the oscillation to precise note values.
- Inertia: Determines how fast parameter changes are applied. Lower values create sweeping effects, noticeably sliding from the old parameter setting towards the new one.
- Dry/Wet: Ratio of the clean and modulated signals, as a percentage.
Shape Devices
As the name suggests, these effects modify the shape of the waveform passing through them. The Distortion and Cabinet Simulator devices focus on making changes to the signal vertically, while the LofiMat applies restrictions to both the vertical and horizontal planes. All three feature separate Dry and Wet Mix sliders for complete control over the volume of the original and altered audio. You may find it useful to watch our Shape Devices video.
Cabinet Simulator
The Cabinet Simulator recreates the sound of hardware amplification cabinets. While obviously aimed at affecting guitar and bass instruments, it’s also great for adding some analogue-style roughness to anything you’d like. The effect consists of three components: a tube pre-amp controlled by the Gain slider to create distortion, an equalizer at the right and the Cabinet itself which can be any of 18 different models.
- Cabinet: Select the type of the Cabinet that will be used. There are bass, guitar and various other models available.
- Routing: Set how the Cabinet Simulator will internally route the signal through the cabinet, EQ and tube.
- Gain: Amount of volume gain applied in the tube. More Gain will result in more distortion.
- Wet/Dry Mix: Volume of the processed/original signal.
- Mono/Stereo: When set to Mono, incoming stereo signals will be combined and processed as a mono signal only. The Cabinet is twice as fast in Mono, so this can be useful to save on CPU consumption if the input signal is mono.
- EQ: A standard EQ with 5 bands and Q settings. See EQ 5 for a detailed description.
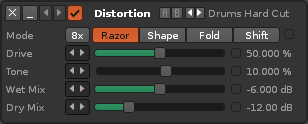
Distortion
The Distortion effect features four Modes to warp the audio and produce a range of characteristic distortion sounds, from traditional overdrive to bizarre sonic extremes.
- 8x: Eight times oversampling. Helps reduce aliasing, but also uses a lot more CPU power.
- Mode Type - Four buttons select the type of distortion:
- Razor: Razor mode cuts off the top of the waveform by amplifying and clamping the signal, also known as clipping. This gives the traditional digital overdrive sound that is quite harsh and full in character.
- Shape: Similar to Razor, but instead of simply being clamped, the new waveform is allowed to be saturated around that point. This results in a warmer sounding overdrive that emulates analogue distortion.
- Fold: Instead of clipping or saturating, part of the waveform is folded back towards the DC line, giving the waveform a slightly triangular shape. At higher values this really mangles the sound, making a distinctive growl. Going beyond this though just creates noise.
- Shift: Similar to Fold, but actually folds the waveform back over to the other side of the DC line. The introduced DC offset is corrected by shifting the signal. This noise-floor distortion gives a very scratchy character without ever turning to complete noise.
- Drive: Controls the amount of distortion. Depending on the selected mode, different amounts of drive produce different sound characteristics.
- Tone: Controls a pre-filter for adjusting distortion color. Values above 0% add brightness to the sound, whereas values below 0% dull the sound.
- Wet/Dry Mix: Volume of the processed/original signal.
Tips and tricks
- The Wet Mix will usually need to be reduced, depending on the amount of distortion applied.
- Sometimes the distortion can sound too harsh or 'cold' - this can be countered by adding a small amount of Dry Mix to add warmth.
- Extreme distortion can bring out a lot of harmonic overtones and high frequency detail - sometimes not all of it is desired. This can be controlled with a Low Pass Filter after the distortion effect.
LofiMat
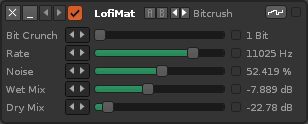
The LofiMat device degrades a signal's audio quality by lowering the bit-depth and sample rate. Gentle use of this device can be good for generating new harmonics, while heavier settings function as a bit-crusher to emulate older digital hardware.
- Bit Crunch: The applied bit-depth (the amount of vertical steps there are to represent different volume levels).
- Rate: The applied sample rate (the amount of times per second that a separate point of volume will be represented).
- Noise: The amount of extra noise that will be added to the signal. The noise will also be degraded by the Bit Crunch.
- Wet/Dry Mix: Volume of the processed/original signal.
- Smooth: Located at the top-right, this will enable smoothing of the waveform. It’s less accurate to the settings but the sound generated may be more to your liking.
Tools Devices
The Tools Devices are a small set of utilities which are often useful to "correct" sounds. You may find it useful to watch our videos on DC Offset and the Gainer & Stereo Expander.
DC Offset
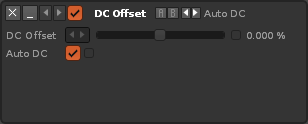
The DC Offset device allows you to shift the signal up and down on the DC line. It is mainly used to correct unwanted DC offsets from signals.
- DC Offset: Shift the signal up or down on the DC line by a set amount. Use the Track Scopes to analyse the changes.
- Auto DC: When enabled, incorrect DC offsets will be automatically corrected by the device.
Gainer
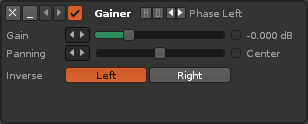
The Gainer provides sliders to adjust the volume and panning of the audio signal, just as the Pre and Post-Mixer devices do. Useful for making those changes at any position in the effect chain.
- Gain: Sets the level of volume adjustment.
- Panning: Sets the panning adjustment of the signal.
- Inverse: Allows the phase of each channel to be separately inverted. This should mainly be used to correct wrongly inverted phases in recordings.
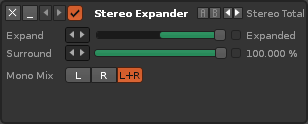
Stereo Expander
The Stereo Expander can adjust the spatial width of the audio by making changes to the signal's phase across the stereo channels.
- Expand: Enhances or reduces the differences between the left and right channel. This will have no effect on a mono signal.
- Surround: Functions the same as the Pre-Mixer's Width parameter, controlling a phasing inversion effect that's applied to the left stereo channel. At 100%, very high frequencies are completely inverted, while lower frequencies are less affected. Higher values tend to feel 'boxed-in'. Very effective for mono signals.
- Mono Mix: When using the Expand option with a negative value, this parameter defines which part of the stereo signal will be retained. "L+R" will use the average of both channels.


