Setting Up MIDI Devices
Setting Up MIDI Devices
You can connect external MIDI devices to Renoise in order to play notes or record controllers (automation). This is often done with a MIDI master keyboard or an external synthesizer which is capable of sending MIDI. While it is possible to use the computer keyboard to enter notes in Renoise, it is not velocity sensitive and can only map two and half octaves at once. So a MIDI keyboard is highly recommended when you want to accurately record "live" playing.
Using the MIDI Mapping function, you can externally map things like starting/stopping the song, changing sequences, levelling tracks and FX etc. This can be done by either mapping regular notes from a master keyboard, or with MIDI hardware which is dedicated to the task, such as MIDI controllers and mixers.
With the MIDI Clock you can sync external MIDI capable devices to the Renoise clock or vice versa.
To play external MIDI instruments you just use the MIDI section of a Renoise instrument, which does not require anything to be set up via the Preferences menu.
Default Setup
By default, Renoise is set up to use the first two devices it finds as input devices. If you don't have more than two devices, MIDI IO might work right out of the box for you. To verify that Renoise recognises your MIDI keyboard or controller, load up a sample and press notes on the keyboard. If you can't hear what you're playing, you should open up the Preferences menu and have a look at the settings.
Monitoring MIDI-IO
To the right of the menu options within the Upper Status Bar will be either two or four small LEDs. If there are four LEDs then the left set refer to MIDI Clock signals, while the right set refer to general MIDI transfers. If there is no MIDI Clock set up, then there will be only two LEDs, representing general MIDI transfers. Every message that is sent from Renoise will blink the red LED, while every message that is received by Renoise will blink the green.
MIDI Preferences
To change the MIDI settings in Renoise, select "Edit->Preferences" from the Upper Status Bar. On MacOS you will find the "Preferences" in the "Renoise" menu at the very left.
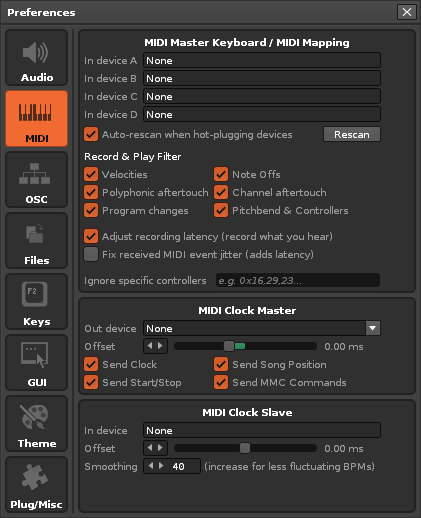
In the Preferences menu, select the MIDI tab:
(Example of the MIDI Preferences tab on Windows)
Device Setup
Clicking on one of the device drop down boxes shows a list of the currently installed MIDI devices. Simply select the one that you would like to use.
On Windows, you may find the same entry appearing twice, one with WDM before the name and one without. If that's the case, then your sound-card or MIDI device offers two different drivers for the same device. WDM is a new kind of driver which offers better timing, so select this one if it works.
On Linux, you will also see some generic names (Renoise Input A/B). These devices are virtual ports that Renoise registers so that other applications can connect to them easily. To do all MIDI routing outside of Renoise with the ALSA MIDI patch-bay applications, take a look at the Linux MIDI HowTo FAQs for more information about this and ALSA in general.
In the above picture, you can see three configuration panels:
- MIDI Master Keyboard / Mapping: Connect your external MIDI master keyboard or MIDI controller to Renoise
- MIDI Clock Master: Send MIDI clock timing information to other MIDI devices
- MIDI Clock Slave: Sync Renoise to external MIDI devices
All that is needed to start is to select the required devices. For a detailed description of the other advanced settings, take a look at the Preferences section of the manual.
