Sampler Keyzones
Keyzones
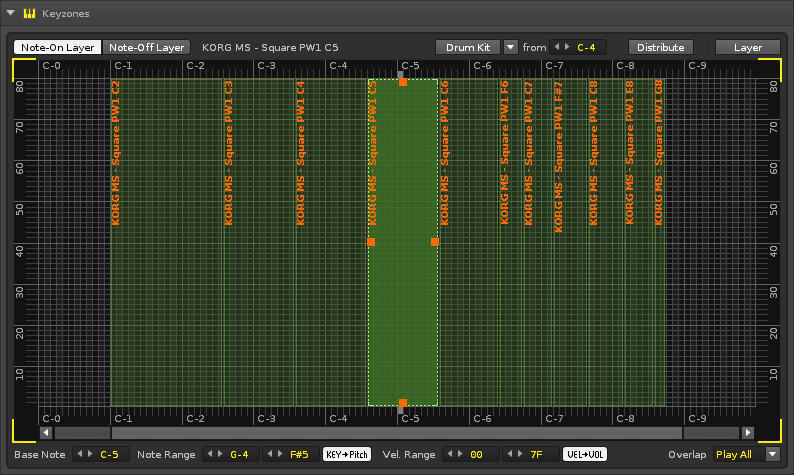
For each sample in an instrument the Keyzones editor can create a zone that stretches across a range of note and velocity values. Notes played via the keyboard can then trigger these zones to play their samples. This can be done for both Note-On (key press) and Note-Off (key release) inputs, via separate layers.
The Interface
The Keyzones interface consists of a large central section that displays the zones, with various options above and below. The note range that can be played within Renoise (C-0 - B-9) is represented horizontally, while the velocity range of 00-80 is shown vertically. This grid is used to create a Keyzone's range for a sample. When a note is played on the keyboard its note/velocity co-ordinates are displayed on the grid and the zone(s) whose range contains those co-ordinates will trigger their samples.
Placing the mouse pointer over the grid and scrolling the mouse wheel will zoom in/out, giving you access to more/less detail horizontally and the scrollbar underneath can be used to move around.
Creating Keyzones
Selecting & Adjusting the Zones
A zone can be selected by left-clicking on it or by selecting a sample from the Sample List. This becomes the active zone, with a highlighted colour and small squares on all four sides. The range of a zone is displayed in the Note and Vel. Range value boxes at the bottom left of the interface. You can resize the active zone by left-click-dragging the edge, while doing this inside the zone will move it around.
If you hold down the left "Shift" key and left-click on another zone, both this and the active zone are selected, along with any zones between them on the grid. You can also left-click (anywhere other than the active zone) and drag to select a range of zones. Holding the left "Ctrl" key ("Command" on Mac) and left-clicking on zones will select/deselect them, allowing you to pick any combination from the grid. When multiple zones are selected, any changes made to the active zone will also affect the others.
File:2.7 instrument samples keyzones selection and alteration.gif
- Double clicking a zone will open the sample in the Waveform editor.
- It is possible to have overlapping zones so that multiple samples are triggered with a single note.
- If the Auto-select option in the Sample List is enabled, zones will be automatically selected by notes that are played within their range.
Inserting & Deleting Zones
To create a new Keyzone you can either insert a new sample via the Sample List or right-click on the grid to open the context menu and choose "Insert New -> Load Sample(s)". Alternatively, select one or more samples from the Disk Browser, drag them onto the Keyzone grid and place them where you want (the horizontal size can be adjusted by moving the mouse pointer up and down before letting go of the mouse button).
A zone can be deleted by selecting it and pressing "Delete" or using the right-click menu and selecting "Remove".
Note On/Off Layers
At the top left of the interface are two buttons that switch the grid focus between creating Keyzones for "Note-On" and "Note-Off" inputs, allowing for the triggering of samples for both the pressing and releasing of a note. It is possible to have a sound only play when a note is released by making its grid co-ordinate have a zone in the "Note-Off" layer but not in "Note-On".
Automatically Distributing Zones
You will find the options for this in the top right corner of the Keyzones interface.
- Drumkit: This will assign each zone to a single note, starting from the note selected in the value box. Opening the drop down menu will reveal two additional options. "Use White Keys Only" will only assign zones to the white keys, while "First Octave for Transposing" will assign an entire octave to the first sample of the instrument.
- Distribute: This evenly distributes all zones across the entire note range.
- Layer: Every zone will span the full note and velocity range. This causes all of an instrument's samples to be simultaneously triggered by any note played.
Keyzone Options
These options are located underneath the main central grid.
- Basenote: The note representing the original pitch of the selected zone's sample. This can also be changed by right-clicking on the note axis along the top/bottom of the grid (the current Basenote is shown there as a coloured block). A Basenote is automatically assigned to a newly created zone. Moving a zone around the grid will not change its Basenote.
- Note Range: This shows the
- KEY➜Pitch:
- Vel. Range:
- VEL➜VOL: To the left of this is the "Map Velocity To Volume" button, which will, when disabled, always play the sample at full volume. This can be useful when mapping samples which are already sampled at lower volumes.
- Overlap:
Using Instrument Envelopes
File:2.7 instrument keyzone velocity button.png
Using Keyzones with a Sliced Sample
With a sliced sample your options are far more limited. Zones cannot be adjusted by velocity and (aside from the initial sample) can only be a single key in width. Additionally, zones cannot be inserted into the Note-Off layer and you have no control over the use of Instrument Envelopes. However, the Drumkit button and its options are still available.
