Sampler Keyzones: Difference between revisions
imported>Achenar No edit summary |
No edit summary |
||
| (48 intermediate revisions by 4 users not shown) | |||
| Line 1: | Line 1: | ||
= | = Keyzones = | ||
Each sample has a Keyzone that defines its playback range along Note and Velocity axes. This range initially covers the entire Keyzone grid, so the sample can always be played. By reducing the range, a sample can be restricted to only play on certain notes at certain velocities. Keyzones can be created for both Note-On (key press) and [[Playing_Notes_with_the_Computer_Keyboard#Note_Off|Note-Off]] (key release) inputs [[#Note_On.2FOff_Layers|via separate layers]]. | |||
Multi-sample files (.sfz) can be loaded and saved as presets using [[Libraries#Specific Preset Types|the drop-down menu located at the top right corner]]. | |||
[[Image:3.1_keyzone.png]] | |||
The interface consists of a large central grid that displays the Keyzones, with various options above and below. The grid's note range of C-0 to B-9 is represented horizontally, while the velocity range of 00 to 80 is shown vertically. When a key is pressed, either with the computer keyboard or via a MIDI controller, its note and velocity values are translated into a coordinate on the Keyzone grid. If this co-ordinate is within a Keyzone's range then it will be activated and its sample is usually played (the [[#Keyzone Options|Overlap mode]] can change this). If the coordinate falls in empty space then nothing happens. | |||
The | |||
[[ | |||
Placing the mouse pointer over the grid and scrolling the mouse wheel will zoom in/out, giving you access to more/less detail horizontally. The scrollbar underneath can be used to move around while zoomed in. | |||
| Line 25: | Line 16: | ||
=== Selecting & Adjusting the Zones === | === Selecting & Adjusting the Zones === | ||
A zone can be selected by left-clicking on it or by selecting a sample from the [[Sampler#Sample List|Sample List]]. This becomes the active zone with a highlighted colour and small squares on all four sides. The active zone's range is displayed in the Note and Velocity value boxes underneath the grid. You can resize the range of an active zone by click-dragging one of its edges. Click-dragging inside the zone will move it around. | |||
If you hold down ''"Left Shift"'' and left-click on another zone, both this and the active zone are selected, along with any zones between them on the grid. You can also left-click (anywhere except the active zone) and drag to select a range of zones. Holding ''"Left Ctrl"'' (''"Command"'' on Mac) and left-clicking on zones will select/deselect them, allowing you to pick any combination from the grid. When multiple zones are selected, any changes made to the active zone will also affect the others. | |||
<!-- RENOISE_NO_PDF_START --> | <!-- RENOISE_NO_PDF_START --> | ||
[[Image:3.0_keyzone-selectandalter.gif]] | |||
[[Image: | |||
<!-- RENOISE_NO_PDF_STOP --> | <!-- RENOISE_NO_PDF_STOP --> | ||
* Double clicking a zone will open the sample in the [[Waveform|Waveform editor]]. | |||
* It is possible to have overlapping zones so that multiple samples are triggered with a single note. | |||
* If the auto-select option [[Image:dux1.0_sampler-autoselect.png|text-bottom]] in the [[Sampler#Sample List|Sample List]] is enabled, zones will be automatically selected by notes that are played within their range. | |||
=== Inserting & Deleting Zones === | === Inserting & Deleting Zones === | ||
To insert a new | To create a new Keyzone you can either insert a new sample via the [[Sampler#Controls|Sample List]] or right-click on the grid to open the context menu and choose ''"Insert New -> Load Sample(s)"''. Alternatively, select one or more samples from the [[Disk Browser]], drag them onto the Keyzone grid and place them where you want (the horizontal size can be adjusted by moving the mouse pointer up and down before letting go of the mouse button). | ||
A zone can be deleted by selecting it and pressing ''"Delete"'' or using the right-click menu and selecting ''"Remove"''. | |||
=== Note On/Off Layers === | |||
[[Image:3.0_keyzone-noteonoff.png]] | |||
[[ | At the top left of the interface are two buttons that switch between creating Keyzones for Note-On (key press) and [[Playing_Notes_with_the_Computer_Keyboard#Note_Off|Note-Off (key release)]] inputs. To move a sample's Keyzone to the Note-Off layer, right-click on the zone or its name in the [[Sampler#Sample_List|Sample List]] and select ''"Move to 'Note-Off Layer'"''. Use the same method to move zones back to the Note-On layer. | ||
=== Automatically Distributing Zones === | |||
[[Image:3.1_keyzones-distributeoptions.png]] | |||
You will find the distribution options at the top right corner of the Keyzones interface. | |||
* '''Drumkit:''' This will assign each zone to a single note, starting from the note selected in the value box. Clicking [[Image:3.1_interface-dropdown.png|text-bottom]] will open a drop down menu with two additional options. ''"Use White Keys Only"'' will only assign zones to the white keys, while ''"First Octave for Transposing"'' will assign an entire octave to the first sample of the instrument. | |||
* '''Distribute:''' This evenly distributes all zones across the entire note range. | |||
* '''Layer:''' Every zone will span the full note and velocity range. This causes all of an instrument's samples to be simultaneously triggered by any note played. | |||
=== Keyzone Options === | |||
[[Image:3.1_keyzones-options.png]] | |||
These options are located underneath the main central grid. | |||
* '''Base Note:''' The note representing the original pitch of the selected zone's sample. This can also be changed by right-clicking on the note axis along the top/bottom of the grid (the current Base note is shown there as a coloured block). A Base note is automatically assigned to a newly created zone. | |||
* '''Note:''' The note range of the active zone. | |||
* '''KEY->Pitch:''' When disabled, the sample will always play at the pitch of the Base note. | |||
* '''Velocity:''' The velocity range of the active zone. | |||
* '''VEL->VOL:''' When disabled, the sample will always play at full volume. This can be useful for lower velocities when samples have already been recorded at a lower volume. | |||
* '''Overlap:''' This dictates how samples will be played when their zones overlap. The default option, ''"Play All"'' will play all samples simultaneously. ''"Cycle"'' will play each sample in the sequence one at a time. ''"Random"'' will randomly play a sample in a round robin sequence (all samples will be played at least once in the randomised sequence). | |||
== Using Keyzones with a Sliced Sample == | == Using Keyzones with a Sliced Sample == | ||
With a sliced sample your options are far more limited | With a [[Waveform#Slice Markers|sliced sample]] your options are far more limited: the Note-Off layer is unavailable, zones cannot be adjusted by velocity and (aside from the initial sample) can only be a single note in width. However, the ''"KEY->Pitch"'', ''"VEL->VOL"'' and ''"Drumkit"'' options are still available. | ||
[[Image: | [[Image:3.1_keyzone-sliced.png]] | ||
Latest revision as of 19:49, 1 April 2024
Keyzones
Each sample has a Keyzone that defines its playback range along Note and Velocity axes. This range initially covers the entire Keyzone grid, so the sample can always be played. By reducing the range, a sample can be restricted to only play on certain notes at certain velocities. Keyzones can be created for both Note-On (key press) and Note-Off (key release) inputs via separate layers.
Multi-sample files (.sfz) can be loaded and saved as presets using the drop-down menu located at the top right corner.
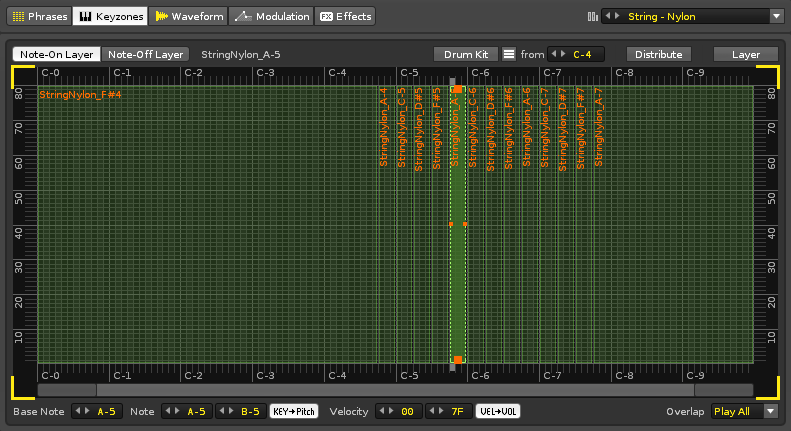
The interface consists of a large central grid that displays the Keyzones, with various options above and below. The grid's note range of C-0 to B-9 is represented horizontally, while the velocity range of 00 to 80 is shown vertically. When a key is pressed, either with the computer keyboard or via a MIDI controller, its note and velocity values are translated into a coordinate on the Keyzone grid. If this co-ordinate is within a Keyzone's range then it will be activated and its sample is usually played (the Overlap mode can change this). If the coordinate falls in empty space then nothing happens.
Placing the mouse pointer over the grid and scrolling the mouse wheel will zoom in/out, giving you access to more/less detail horizontally. The scrollbar underneath can be used to move around while zoomed in.
Creating Keyzones
Selecting & Adjusting the Zones
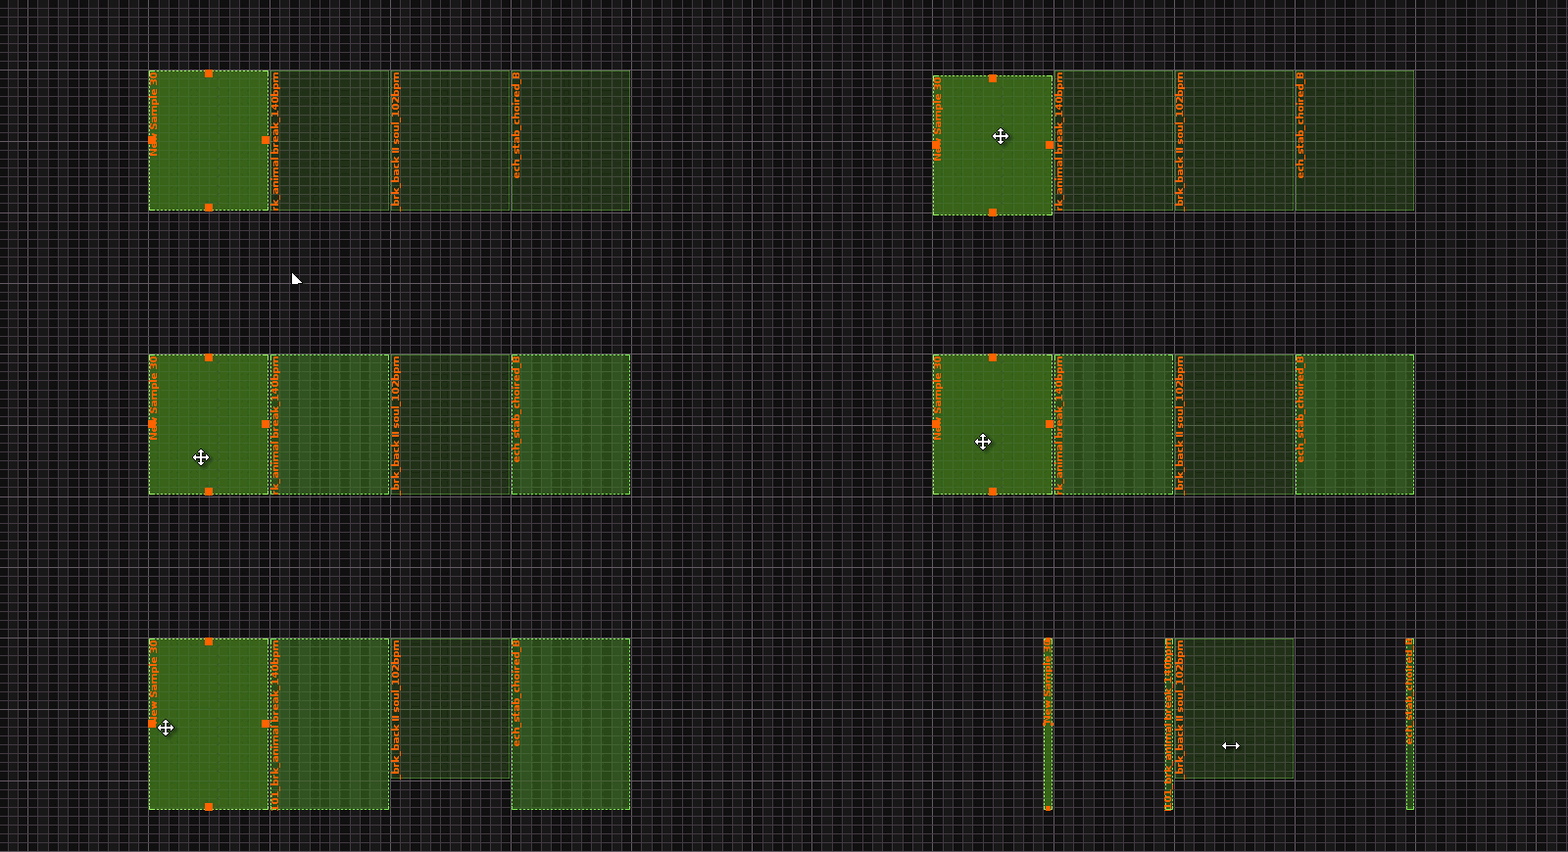
A zone can be selected by left-clicking on it or by selecting a sample from the Sample List. This becomes the active zone with a highlighted colour and small squares on all four sides. The active zone's range is displayed in the Note and Velocity value boxes underneath the grid. You can resize the range of an active zone by click-dragging one of its edges. Click-dragging inside the zone will move it around.
If you hold down "Left Shift" and left-click on another zone, both this and the active zone are selected, along with any zones between them on the grid. You can also left-click (anywhere except the active zone) and drag to select a range of zones. Holding "Left Ctrl" ("Command" on Mac) and left-clicking on zones will select/deselect them, allowing you to pick any combination from the grid. When multiple zones are selected, any changes made to the active zone will also affect the others.
- Double clicking a zone will open the sample in the Waveform editor.
- It is possible to have overlapping zones so that multiple samples are triggered with a single note.
- If the auto-select option
 in the Sample List is enabled, zones will be automatically selected by notes that are played within their range.
Inserting & Deleting Zones
To create a new Keyzone you can either insert a new sample via the Sample List or right-click on the grid to open the context menu and choose "Insert New -> Load Sample(s)". Alternatively, select one or more samples from the Disk Browser, drag them onto the Keyzone grid and place them where you want (the horizontal size can be adjusted by moving the mouse pointer up and down before letting go of the mouse button).
A zone can be deleted by selecting it and pressing "Delete" or using the right-click menu and selecting "Remove".
Note On/Off Layers
At the top left of the interface are two buttons that switch between creating Keyzones for Note-On (key press) and Note-Off (key release) inputs. To move a sample's Keyzone to the Note-Off layer, right-click on the zone or its name in the Sample List and select "Move to 'Note-Off Layer'". Use the same method to move zones back to the Note-On layer.
Automatically Distributing Zones
You will find the distribution options at the top right corner of the Keyzones interface.
- Drumkit: This will assign each zone to a single note, starting from the note selected in the value box. Clicking
 will open a drop down menu with two additional options. "Use White Keys Only" will only assign zones to the white keys, while "First Octave for Transposing" will assign an entire octave to the first sample of the instrument.
 - Distribute: This evenly distributes all zones across the entire note range.
- Layer: Every zone will span the full note and velocity range. This causes all of an instrument's samples to be simultaneously triggered by any note played.
Keyzone Options
These options are located underneath the main central grid.
- Base Note: The note representing the original pitch of the selected zone's sample. This can also be changed by right-clicking on the note axis along the top/bottom of the grid (the current Base note is shown there as a coloured block). A Base note is automatically assigned to a newly created zone.
- Note: The note range of the active zone.
- KEY->Pitch: When disabled, the sample will always play at the pitch of the Base note.
- Velocity: The velocity range of the active zone.
- VEL->VOL: When disabled, the sample will always play at full volume. This can be useful for lower velocities when samples have already been recorded at a lower volume.
- Overlap: This dictates how samples will be played when their zones overlap. The default option, "Play All" will play all samples simultaneously. "Cycle" will play each sample in the sequence one at a time. "Random" will randomly play a sample in a round robin sequence (all samples will be played at least once in the randomised sequence).
Using Keyzones with a Sliced Sample
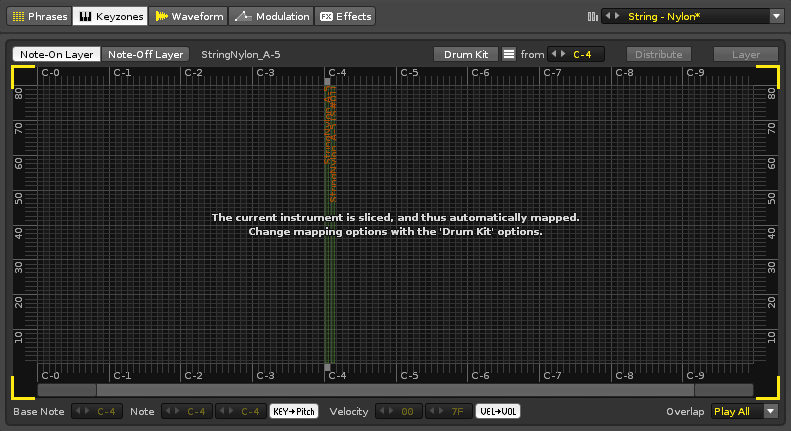
With a sliced sample your options are far more limited: the Note-Off layer is unavailable, zones cannot be adjusted by velocity and (aside from the initial sample) can only be a single note in width. However, the "KEY->Pitch", "VEL->VOL" and "Drumkit" options are still available.


