Effect Commands: Difference between revisions
imported>Achenar No edit summary |
No edit summary |
||
| (26 intermediate revisions by 2 users not shown) | |||
| Line 1: | Line 1: | ||
= Effect Commands = | = Effect Commands = | ||
Effect Commands are used in the [[Pattern Editor]] and [[Phrase Editor]] to perform a variety of tasks, from changing the volume of a single note, to automating the parameters of [[Effect Chains|Track Effects]], or controlling the song during playback. They also allow various direct manipulations of sample audio, which can ''only'' be done via Effect Commands and is a major feature that differentiates trackers from other DAWs. Examples include: starting the playback of a sample from the middle (S effect), then playing it in reverse (B effect), panning it fully to the left (pan column), | Effect Commands are used in the [[Pattern Editor]] and [[Phrase Editor]] to perform a variety of tasks, from changing the volume of a single note, to automating the parameters of [[Effect Chains|Track Effects]], or controlling the song during playback. They also allow various direct manipulations of sample audio, which can ''only'' be done via Effect Commands and is a major feature that differentiates trackers from other DAWs. Examples include: starting the playback of a sample from the middle (S effect), then playing it in reverse (B effect), panning it fully to the left (pan column), then retriggering the waveform at its current position (R effect in the pan column) while simultaneously gliding to another note one octave down (G effect). All this can be easily and precisely achieved with Effect Commands. | ||
You may find it useful to watch our [https://www.youtube.com/playlist?list=PLB7op_Ds1S5xvpUcsGV9KxtjhGuzybuz8 9-part "Effect Commands" video series], which provides explanations and demonstrations on this subject. | You may find it useful to watch our [https://www.youtube.com/playlist?list=PLB7op_Ds1S5xvpUcsGV9KxtjhGuzybuz8 9-part "Effect Commands" video series], which provides explanations and demonstrations on this subject. | ||
| Line 8: | Line 8: | ||
== Recording and Editing Effect Commands == | == Recording and Editing Effect Commands == | ||
Effect | Effect Commands are recorded in [[Recording and Editing Notes#Edit Mode|Edit Mode]] with the [[Tracker Interface]], so if you're unfamiliar with this method of working, you should [[Tracker Interface|read through that section]] of the manual before continuing here. | ||
[[Image:3. | [[Image:3.2_trackerinterface-columns.png]] | ||
Values are entered using the row of numbers above the letters on the keyboard, not the number-pad, which is reserved for [[Instrument Selector#Shortcuts|quickly switching between instruments in the Instrument Selector]]. Entering a value will place it at that exact digit in the column. For example, if you are at the first digit in the Volume column and press '4', the value will become '40'. If you want the value to be '48', then move the cursor over to the second digit using the arrow keys and press '8' there. | Values are entered using the row of numbers above the letters on the keyboard, not the number-pad, which is reserved for [[Instrument Selector#Shortcuts|quickly switching between instruments in the Instrument Selector]]. Entering a value will place it at that exact digit in the column. For example, if you are at the first digit in the Volume column and press '4', the value will become '40'. If you want the value to be '48', then move the cursor over to the second digit using the arrow keys and press '8' there. | ||
| Line 18: | Line 18: | ||
=== Ticks === | === Ticks === | ||
Many Effect Commands make use of 'ticks', so it's important to understand | Many Effect Commands make use of 'ticks', so it's important to understand the concept. Just as a pattern is split into a number of lines, so each line is split into a number of Ticks. A tick is when an update is made to certain things if they makes changes over the course of a line. The things affected are Effect Commands, interpolation between points in [[Graphical Automation]] and meta devices such as the [[Meta_Devices#.2ALFO|LFO]]. In Renoise, this tick fraction is configurable with the Ticks Per Line parameter in the [[Song Options#Playback Options|Song Options]] panel. | ||
==== Ticks vs. Note Delays ==== | ==== Ticks vs. Note Delays ==== | ||
As shown above, note columns have a delay sub-column, which lets you delay the note to the left of it on the same line. These delays do not use ticks, but instead always divide a line into 256 slices. | As shown above, note columns have a delay sub-column, which lets you delay the note to the left of it on the same line. These delays do not use ticks, but instead always divide a line into 256 slices. | ||
== Effect Listing == | == Effect Listing == | ||
| Line 33: | Line 28: | ||
* '''xx''' and '''xy''' are place-holders whose meanings are explained in the Effect Command descriptions. They should be replaced with values to create an effect. '''xx''' means both digits are one whole value. '''xy''' means that the '''x''' and '''y''' are separate values. | * '''xx''' and '''xy''' are place-holders whose meanings are explained in the Effect Command descriptions. They should be replaced with values to create an effect. '''xx''' means both digits are one whole value. '''xy''' means that the '''x''' and '''y''' are separate values. | ||
* All values shown below are [[Hexadecimal]]. | * All values shown below are [[Tracker Interface#Hexadecimal|hexadecimal]]. | ||
* Similar effect styles are highlighted with the same colour (e.g. pitch up, down and glide are all red, though the exact colour depends on the [[Preferences#Theme|current interface Theme]]). | * Similar effect styles are highlighted with the same colour (e.g. pitch up, down and glide are all red, though the exact colour depends on the [[Preferences#Theme|current interface Theme]]). | ||
| Line 39: | Line 34: | ||
* When typing commands into the pattern/phrase, a helpful summary about them will appear in the [[Main_Screen#Lower_Status_Bar|Lower Status Bar]]. | * When typing commands into the pattern/phrase, a helpful summary about them will appear in the [[Main_Screen#Lower_Status_Bar|Lower Status Bar]]. | ||
* | * The U, D, G, V, I, O, T and N commands will repeat the last valid value if a value of 00 is used. This way you can quickly enter a series of commands without having to continually type the exact value. | ||
* You can use the small FX drop down menu as both a quick reference and an easy method of inserting commands: [[Image:3.0_patterneditor-fxmenu.png|text-bottom]] For phrases, this is found in the [[Phrase Editor#Phrase Editor Options|Phrase Editor options]]. For the Pattern Editor, this is in the [[Pattern Editor#Pattern Editor Control Panel|control panel]] the bottom of the editor. | * You can use the small FX drop down menu as both a quick reference and an easy method of inserting commands: [[Image:3.0_patterneditor-fxmenu.png|text-bottom]] For phrases, this is found in the [[Phrase Editor#Phrase Editor Options|Phrase Editor options]]. For the Pattern Editor, this is in the [[Pattern Editor#Pattern Editor Control Panel|control panel]] the bottom of the editor. | ||
*We also have an Effect Command reference card available for download, available in four different versions: | * We also have an Effect Command reference card available for download, available in four different versions: | ||
** [https:// | ** [https://tutorials.renoise.com/images/5/56/Effect_Commands_16-9.png Screen 16:9] | ||
** [https:// | ** [https://tutorials.renoise.com/images/d/d0/Effect_Commands_A4.png Screen A4] | ||
** [https:// | ** [https://tutorials.renoise.com/images/1/1f/Effect_Commands_16-9_print.png Print 16:9] | ||
** [https:// | ** [https://tutorials.renoise.com/images/0/00/Effect_Commands_A4_print.png Print A4] | ||
=== Local & Master FX Effect Columns === | === Local & Master FX Effect Columns === | ||
| Line 56: | Line 50: | ||
These commands only apply to [[Sampler|samples]] and will have no effect on the [[Plugin]] or [[MIDI]] components of an [[Instruments|Instrument]]. When used in the [[Pattern Editor#Master Track|Master track]], the effect will be applied to all tracks. | These commands only apply to [[Sampler|samples]] and will have no effect on the [[Plugin]] or [[MIDI]] components of an [[Instruments|Instrument]]. When used in the [[Pattern Editor#Master Track|Master track]], the effect will be applied to all tracks. | ||
* '''-Axy''' - Set arpeggio, x/y = first/second note offset in semitones. Using 0 for x or y will use the original note. | * '''<span style="color:#d96e3d;">-Axy</span>''' - Set arpeggio, x/y = first/second note offset in semitones. Using 0 for x or y will use the original note. | ||
* '''-Uxx''' - Slide pitch up by xx 1/16ths of a semitone (01 is 1/16th of a semitone, 08 is half a semitone, 10 is a whole semitone). | * '''<span style="color:#d96e3d;">-Uxx</span>''' - Slide pitch up by xx 1/16ths of a semitone (01 is 1/16th of a semitone, 08 is half a semitone, 10 is a whole semitone). | ||
* '''-Dxx''' - Slide pitch down by xx 1/16ths of a semitone (01 is 1/16th of a semitone, 08 is half a semitone, 10 is a whole semitone). | * '''<span style="color:#d96e3d;">-Dxx</span>''' - Slide pitch down by xx 1/16ths of a semitone (01 is 1/16th of a semitone, 08 is half a semitone, 10 is a whole semitone). | ||
* '''-Gxx''' - Glide towards given note by xx 1/16ths of a semitone (01 is 1/16th of a semitone, 08 is half a semitone, 10 is a whole semitone). A value of FF will make the slide instant. | * '''<span style="color:#d96e3d;">-Gxx</span>''' - Glide towards given note by xx 1/16ths of a semitone (01 is 1/16th of a semitone, 08 is half a semitone, 10 is a whole semitone). A value of FF will make the slide instant. | ||
* '''-Ixx''' - Fade volume in by xx volume units (-I01 inserted 256 times will slide from 0 to full volume, -I7F inserted twice will do the same much faster). | * '''<span style="color:#d96e3d;">-Vxy</span>''' - Set vibrato (regular pitch variation), x = speed, y = depth. | ||
* '''-Oxx''' - Fade volume out by xx volume units. | * '''<span style="color:#bfba26;">-Ixx</span>''' - Fade volume in by xx volume units (-I01 inserted 256 times will slide from 0 to full volume, -I7F inserted twice will do the same much faster). | ||
* '''-Txy''' - Set tremolo (regular volume variation), x = speed, y = depth. | * '''<span style="color:#bfba26;">-Oxx</span>''' - Fade volume out by xx volume units. | ||
* '''-Cxy''' - Cut volume to x after y ticks (x = volume factor: 0=0%, F=100%). | * '''<span style="color:#bfba26;">-Txy</span>''' - Set tremolo (regular volume variation), x = speed, y = depth. | ||
* '''-Sxx''' - Trigger sample [[Waveform#Slice_Markers|slice number]] xx or offset xx. | * '''<span style="color:#bfba26;">-Cxy</span>''' - Cut volume to x after y ticks (x = volume factor: 0=0%, F=100%). Does not stop playback. | ||
* '''-Bxx''' - Play sample backwards (xx = 00) or forwards (xx = 01). | * '''<span style="color:#3eb6de;">-Sxx</span>''' - Trigger sample [[Waveform#Slice_Markers|slice number]] xx or offset xx. | ||
* '''- | * '''<span style="color:#3eb6de;">-Bxx</span>''' - Play sample backwards (xx = 00) or forwards (xx = 01). | ||
* '''-Nxy''' - Set auto pan (regular pan variation), x = speed, y = depth | * '''<span style="color:#3eb6de;">-Exx</span>''' - Set the position of all active Envelope, AHDSR, Fader and Stepper [[Modulation|Modulation devices]] to offset xx. | ||
* '''<span style="color:#7ec466;">-Nxy</span>''' - Set auto pan (regular pan variation), x = speed, y = depth. | |||
==== Sample Command Variations ''(Renoise only)'' ==== | ==== Sample Command Variations ''(Renoise only)'' ==== | ||
| Line 74: | Line 68: | ||
A few commands will behave differently when used in the [[Pattern Editor]] to affect a [[Phrase Editor|phrase]]: | A few commands will behave differently when used in the [[Pattern Editor]] to affect a [[Phrase Editor|phrase]]: | ||
* '''-Sxx''' - Trigger phrase from line xx. | * '''<span style="color:#3eb6de;">-Sxx</span>''' - Trigger phrase from line xx. | ||
* '''-Bxx''' - Play phrase backwards (xx = 00) or forwards (xx = 01). | * '''<span style="color:#3eb6de;">-Bxx</span>''' - Play phrase backwards (xx = 00) or forwards (xx = 01). | ||
* '''-Ixx''', '''-Oxx''', '''-Txy''' - Will also affect the volume of any [[Plugin]] or [[MIDI]] playing in the phrase. | * '''<span style="color:#bfba26;">-Ixx</span>''', '''<span style="color:#bfba26;">-Oxx</span>''', '''<span style="color:#bfba26;">-Txy</span>''' - Will also affect the volume of any [[Plugin]] or [[MIDI]] playing in the phrase. | ||
==== Instrument Commands ==== | ==== Instrument Commands ==== | ||
| Line 82: | Line 76: | ||
These commands will affect all of the [[Sampler|sample]], [[Plugin]] and [[MIDI]] components of an [[Instruments|Instrument]]. They can be used in the [[Pattern Editor#Master Track|Master track]] to apply the effect to all tracks, except for -Yxx and -Zxx. | These commands will affect all of the [[Sampler|sample]], [[Plugin]] and [[MIDI]] components of an [[Instruments|Instrument]]. They can be used in the [[Pattern Editor#Master Track|Master track]] to apply the effect to all tracks, except for -Yxx and -Zxx. | ||
* '''- | * '''<span style="color:#bfba26;">-Mxx</span>''' - Set channel volume level, 00 = -60dB, FF = +3dB. | ||
* '''- | * '''<span style="color:#c065c2;">-Zxx</span>''' - Trigger phrase number xx (01 - 7E, 00 = no phrase, 7F = [[Phrase_Editor#Phrases_in_Keymap_Mode|keymap mode]]). | ||
* '''-Yxx''' - MaYbe trigger the line with probability xx. 00 = mutually exclusive mode (will trigger only one note on this line, where the chance of triggering is inserted into the [[Tracker_Interface#Columns|Local FX column]], or the [[#Volume or Panning Column|volume or panning column]] using Yx). | * '''<span style="color:#3eb6de;">-Qxx</span>''' - Delay playback of the line by xx ticks (00 - [[#Ticks|TPL]]). | ||
* ''' | * '''<span style="color:#3eb6de;">-Yxx</span>''' - MaYbe trigger the line with probability xx. 00 = mutually exclusive mode (will trigger only one note on this line, where the chance of triggering is inserted into the [[Tracker_Interface#Columns|Local FX column]], or the [[#Volume or Panning Column|volume or panning column]] using Yx). | ||
* '''<span style="color:#3eb6de;">-Rxy</span>''' - Retrigger instruments that are currently playing. This is done every y ticks with volume factor x applied to each retrigger, where x represents: | |||
** '''0''' - No volume change | ** '''0''' - No volume change | ||
** '''1''' - Lower volume by 3% | ** '''1''' - Lower volume by 3% | ||
| Line 108: | Line 102: | ||
Only applies to the Renoise [[Pattern Editor]]. These commands specifically target the [[Effect Chains|track's effect devices]]. | Only applies to the Renoise [[Pattern Editor]]. These commands specifically target the [[Effect Chains|track's effect devices]]. | ||
* ''' | * '''<span style="color:#bfba26;">-Lxx</span>''' - Set [[Effect Chains#Pre_and_Post_Mixer_Effects|track pre-mixer's]] volume level, 00 = -INF, FF = +3dB. | ||
* '''<span style="color:#7ec466;">-Pxx</span>''' - Set [[Effect Chains#Pre_and_Post_Mixer_Effects|track pre-mixer's]] panning, 00 = full left, 80 = center, FF = full right. | |||
* '''-Pxx''' - Set [[Effect Chains#Pre_and_Post_Mixer_Effects|track pre-mixer's]] panning, 00 = full left, 80 = center, FF = full right. | * '''<span style="color:#7ec466;">-Wxx</span>''' - Set [[Effect Chains#Pre_and_Post_Mixer_Effects|track pre-mixer's]] surround width, 00 = off, FF = max. | ||
* '''-Wxx''' - Set [[Effect Chains#Pre_and_Post_Mixer_Effects|track pre-mixer's]] surround width, 00 = off, FF = max. | * '''<span style="color:#c065c2;">-Xxx</span>''' - Stop all notes and FX (-X00), or a specific effect (-Xxx, where xx > 00). | ||
* '''-Xxx''' - Stop all notes and FX (-X00), or a specific effect (-Xxx, where xx > 00). | * '''<span style="color:#c065c2;">-Jxx</span>''' - Set [[Effect Chains#Pre_and_Post_Mixer_Effects|track's output routing]] to channel xx, 01 upwards = hardware channels, FF downwards = parent groups (00 is the master track, 01 is the first soundcard output channel and FF is the closest parent group track). | ||
You can also change any [[Effect Chains|Track Effect]] parameter with Effect Commands by using the first digit to target a specific device in the effect chain: | You can also change any [[Effect Chains|Track Effect]] parameter with Effect Commands by using the first digit to target a specific device in the effect chain: | ||
xyzz - | * '''<span style="color:#5c93b8;">xyzz</span>''' - x is the xth device in the effect chain, y is the yth parameter in the device. For example: if you have a [[Audio Effects#Distortion|Distortion]] device as the first effect in the chain, then 13FF will set the [[Audio Effects#Distortion|Distortion's]] Tone parameter to the maximum value (1 = [[Audio Effects#Distortion|Distortion]] device (the first effect), 3 = Tone (the third parameter), FF = maximum value). | ||
You can also enable and disable specific effect devices with the following commands: | You can also enable and disable specific effect devices with the following commands: | ||
* '''x000''' - Turn effect x off. | * '''<span style="color:#5c93b8;">x000</span>''' - Turn effect x off. | ||
* '''x001''' - Turn effect x on. | * '''<span style="color:#5c93b8;">x001</span>''' - Turn effect x on. | ||
Moving a device's slider will also show the Effect Command in the [[Main_Screen#Lower_Status_Bar|Lower Status Bar]]. Right-clicking a slider will automatically record the parameter changes into the track's [[Tracker Interface#Columns|Master FX Column]] when [[Pattern_Editor#Pattern_Editor_Control_Panel|pattern Automation recording mode]] is set record into the pattern. | Moving a device's slider will also show the Effect Command in the [[Main_Screen#Lower_Status_Bar|Lower Status Bar]]. Right-clicking a slider will automatically record the parameter changes into the track's [[Tracker Interface#Columns|Master FX Column]] when [[Pattern_Editor#Pattern_Editor_Control_Panel|pattern Automation recording mode]] is set record into the pattern. | ||
| Line 129: | Line 123: | ||
Only applies to the Renoise [[Pattern Editor]]. These commands control the song during playback. | Only applies to the Renoise [[Pattern Editor]]. These commands control the song during playback. | ||
* '''ZTxx''' - Set [[Transport Panel#Song Parameters|tempo (BPM)]] ( | * '''<span style="color:#e0932d;">ZTxx</span>''' - Set [[Transport Panel#Song Parameters|tempo (BPM)]] (14 - FF, 00 = stop song) | ||
* '''ZLxx''' - Set [[Transport Panel#Song Parameters|Lines Per Beat (LPB)]] (01 - FF, 00 = stop song). | * '''<span style="color:#e0932d;">ZLxx</span>''' - Set [[Transport Panel#Song Parameters|Lines Per Beat (LPB)]] (01 - FF, 00 = stop song). | ||
* '''ZKxx''' - Set [[ | * '''<span style="color:#e0932d;">ZKxx</span>''' - Set [[Song_Options#Playback_Options|Ticks Per Line (TPL)]] (01 - 10). | ||
* '''ZGxx''' - Toggle [[ | * '''<span style="color:#e0932d;">ZGxx</span>''' - Toggle [[Groove Settings|song Groove]] on/off (00 = turn off, 01 or higher = turn on). | ||
* '''ZBxx''' - Break pattern. The current pattern finishes immediately and jumps to next pattern at line xx ( | * '''<span style="color:#e0932d;">ZBxx</span>''' - Break pattern. The current pattern finishes immediately and jumps to next pattern at line xx (remember that although this value is [[Tracker_Interface#Hexadecimal|hexadecimal]] pattern lines are [[Preferences#Pattern.2FPhrase_Editor|usually displayed]] as decimals). | ||
* '''ZDxx''' - Delay (pause) pattern playback by xx lines. | * '''<span style="color:#e0932d;">ZDxx</span>''' - Delay (pause) pattern playback by xx lines. | ||
=== Volume Column === | === Volume Column === | ||
* '''00-7F''' - Set note volume/velocity where 00=minimum and 80=maximum. This can also be used for polyphonic after-touch in VST/MIDI instruments that support it. | * '''<span style="color:#bfba26;">00-7F</span>''' - Set note volume/velocity where 00=minimum and 80=maximum. This can also be used for polyphonic after-touch in VST/MIDI instruments that support it. | ||
* '''Ix''' - Volume fade in in the current note column, with step x*10 (I1 = -I10 in effect column, I2 = -I20, etc.) | * '''<span style="color:#bfba26;">Ix</span>''' - Volume fade in in the current note column, with step x*10 (I1 = -I10 in effect column, I2 = -I20, etc.) | ||
* '''Ox''' - Volume fade out in the current note column, with step x*10 (O1 = -O10, O2 = -O20, etc.) | * '''<span style="color:#bfba26;">Ox</span>''' - Volume fade out in the current note column, with step x*10 (O1 = -O10, O2 = -O20, etc.) | ||
=== Panning Column === | === Panning Column === | ||
* '''00-80''' - Set panning of current note column: 00 = full left, 40 = center, 80 = full right. | * '''<span style="color:#7ec466;">00-80</span>''' - Set panning of current note column: 00 = full left, 40 = center, 80 = full right. | ||
* '''Jx''' - Panning slide left with step x (0 - F). | * '''<span style="color:#7ec466;">Jx</span>''' - Panning slide left with step x (0 - F). | ||
* '''Kx''' - Panning slide right with step x (0 - F). | * '''<span style="color:#7ec466;">Kx</span>''' - Panning slide right with step x (0 - F). | ||
=== Volume or Panning Column === | === Volume or Panning Column === | ||
* '''Ux''' - Slide pitch up by x semitones. | * '''<span style="color:#d96e3d;">Ux</span>''' - Slide pitch up by x semitones. | ||
* '''Dx''' - Slide pitch down by x semitones. | * '''<span style="color:#d96e3d;">Dx</span>''' - Slide pitch down by x semitones. | ||
* '''Gx''' - Glide towards given note by x semitones. A value of F will make the slide instant. | * '''<span style="color:#d96e3d;">Gx</span>''' - Glide towards given note by x semitones. A value of F will make the slide instant. | ||
* '''Cx''' - Cut the note after x ticks (0 - F). | * '''<span style="color:#bfba26;">Cx</span>''' - Cut the note after x ticks (0 - F). Unlike [[#Local_.26_Master_FX_Effect_Columns|-Cxy]] this stops playback (without triggering a [[Playing_Notes_with_the_Computer_Keyboard#Note_Off|Note-Off]]) and will affect [[Plugin]] & [[MIDI]]. | ||
* '''<span style="color:#3eb6de;">Bx</span>''' - Play sample in the current note column backwards (0 is backwards, 1 is forwards again). | |||
* '''Bx''' - Play sample in the current note column backwards (0 is backwards, 1 is forwards again). | * '''<span style="color:#3eb6de;">Qx</span>''' - Delay a note by x ticks (0 - F). | ||
* ''' | * '''<span style="color:#3eb6de;">Yx</span>''' - MaYbe trigger note with probability x. | ||
* '''Yx''' - MaYbe trigger note with probability x. | * '''<span style="color:#3eb6de;">Rx</span>''' - Retrigger a note every x ticks (0 - F). | ||
'''Note:''' The panning/volume '''Rx''' version of retrigger does not restart the sample from the beginning, while the '''-Rxy''' effect command does. This behaviour is intended to give you a choice of two different retrigger modes. | '''Note:''' The panning/volume '''Rx''' version of retrigger does not restart the sample from the beginning, while the '''-Rxy''' effect command does. This behaviour is intended to give you a choice of two different retrigger modes. | ||
| Line 164: | Line 157: | ||
=== Delay Column === | === Delay Column === | ||
* '''00-FF''' - The delay column can only be used to delay a note or [[Playing_Notes_with_the_Computer_Keyboard#Note_Off|Note-Off]], where 00 is no delay and FF will result in the note being delayed until immediately before the next line. For example: | * '''<span style="color:#3eb6de;">00-FF</span>''' - The delay column can only be used to delay a note or [[Playing_Notes_with_the_Computer_Keyboard#Note_Off|Note-Off]], where 00 is no delay and FF will result in the note being delayed until immediately before the next line. For example: | ||
** '''40''' - 25% delay<br> | ** '''40''' - 25% delay<br> | ||
** '''80''' - 50% delay<br> | ** '''80''' - 50% delay<br> | ||
| Line 177: | Line 170: | ||
</tt> | </tt> | ||
* '''M0''' - Controller change message, xx = controller number, yy = controller value. | * '''<span style="color:#808080;">M0</span>''' - Controller change message, xx = controller number, yy = controller value. | ||
* '''M1''' - Pitch bend, xx = main value, yy = fine-tune value. | * '''<span style="color:#808080;">M1</span>''' - Pitch bend, xx = main value, yy = fine-tune value. | ||
* '''M2''' - Program change, yy = program number (00 - 7F). | * '''<span style="color:#808080;">M2</span>''' - Program change, yy = program number (00 - 7F). | ||
* '''M3''' - Channel pressure (monophonic after-touch), yy = pressure amount. | * '''<span style="color:#808080;">M3</span>''' - Channel pressure (monophonic after-touch), yy = pressure amount. | ||
[[image:3. | [[image:3.2_patterneffects-midi.png]] | ||
'''Note:''' Insert the '''Mx''' MIDI commands in the panning column of the ''right-most note column''. MIDI commands show a different syntax colour than when they function as panning values and a -000 value is automatically filled in on the effect column. | '''Note:''' Insert the '''Mx''' MIDI commands in the panning column of the ''right-most note column''. MIDI commands show a different syntax colour than when they function as panning values and a -000 value is automatically filled in on the effect column. | ||
| Line 188: | Line 181: | ||
Take care that you also add the instrument number, so that Renoise knows which MIDI instrument the command will be targeting. | Take care that you also add the instrument number, so that Renoise knows which MIDI instrument the command will be targeting. | ||
MIDI and plugin instruments can also be automated through [[Meta Devices#*Instrument MIDI Control|*Instrument MIDI Control]] or [[Meta_Devices# | MIDI and plugin instruments can also be automated through [[Meta Devices#*Instrument MIDI Control|*Instrument MIDI Control]] or [[Meta_Devices#*Instrument_Automation|*Instrument Automation]] devices. | ||
| Line 202: | Line 195: | ||
=== Pitch Slide === | === Pitch Slide === | ||
[[Image:3. | [[Image:3.2_patterneffects-pitchslide.png]] | ||
'''1. Pitch slide up < | '''1. Pitch slide up <span style="color:#d96e3d;">-Uxx</span>:''' [http://reg.s63.xrea.com/tutorial-21/sound/lesson6-pitch-01.mp3 Sound file (mp3)] | ||
From line 00 to 07, the sample is pitched up at a constant rate of 20 (hexadecimal notation), where 00 means "repeat the previous value". | From line 00 to 07, the sample is pitched up at a constant rate of 20 ([[Tracker Interface#Hexadecimal|hexadecimal]] notation), where 00 means "repeat the previous value". | ||
'''2. Glide to note < | '''2. Glide to note <span style="color:#d96e3d;">-Gxx</span>:''' [http://reg.s63.xrea.com/tutorial-21/sound/lesson6-pitch-02.mp3 Sound file (mp3)] | ||
The first note is played at C-4. At line 04 the pitch rises at a constant rate of 20 (hexadecimal notation) towards A-4. Once the glide reaches reaches the desired pitch of A-4, subsequent | The first note is played at C-4. At line 04 the pitch rises at a constant rate of 20 ([[Tracker Interface#Hexadecimal|hexadecimal]] notation) towards A-4. Once the glide reaches reaches the desired pitch of A-4, subsequent G commands are ignored. | ||
=== Breakbeat Tricks === | === Breakbeat Tricks === | ||
[[Image:3. | [[Image:3.2_patterneffects-breakbeat.png]] | ||
'''1. Original Loop:''' [http://reg.s63.xrea.com/tutorial-21/sound/lesson6-beat-00.mp3 Sound file (mp3)] | '''1. Original Loop:''' [http://reg.s63.xrea.com/tutorial-21/sound/lesson6-beat-00.mp3 Sound file (mp3)] | ||
'''2. Sample offset < | '''2. Sample offset <span style="color:#3eb6de;">-Sxx</span>:''' [http://reg.s63.xrea.com/tutorial-21/sound/lesson6-beat-01.mp3 Sound file (mp3)] | ||
The offset command works by splitting a sample into 256 equal parts. The larger the sample, the more inaccurate this command will be. As the range of values is 00 to FF, | The offset command works by splitting a sample into 256 equal parts. The larger the sample, the more inaccurate this command will be. As the range of values is 00 to FF, -S80 plays the sample from halfway through and -S40 plays the sample from one quarter of the way through. | ||
'''3. Retrigger note < | '''3. Retrigger note <span style="color:#3eb6de;">Rx</span>:''' [http://reg.s63.xrea.com/tutorial-21/sound/lesson6-beat-02.mp3 Sound file (mp3)] | ||
This effect replays the sample very quickly at its current position in the waveform playback. x sets how many ticks to count before retriggering the sample again. By default, there are 12 ticks per line. Setting R4 will retrigger a sample 3 times per line (12÷4=3). | This effect replays the sample very quickly at its current position in the waveform playback. x sets how many ticks to count before retriggering the sample again. By default, there are 12 ticks per line. Setting R4 will retrigger a sample 3 times per line (12÷4=3). | ||
'''4. Reverse sample < | '''4. Reverse sample <span style="color:#3eb6de;">B0</span>, <span style="color:#3eb6de;">B1</span>:''' [http://reg.s63.xrea.com/tutorial-21/sound/lesson6-beat-03.mp3 Sound file (mp3)] | ||
B0 plays the sample backwards from that point. B1 resumes normal playback. | B0 plays the sample backwards from that point. B1 resumes normal playback. | ||
| Line 234: | Line 227: | ||
Here are two techniques for programming a delay: | Here are two techniques for programming a delay: | ||
[[Image:3. | [[Image:3.2_patterneffects-delay.png]] | ||
'''1. Delay note < | '''1. Delay note <span style="color:#3eb6de;">Qx</span>:''' | ||
Qx delays by [[#Ticks|ticks]]. A line is divided into equal [[#Ticks|ticks]], the default value being 12. By using the Q8 command in the volume or panning column, the note is delayed by 8 [[#Ticks|ticks]]. | Qx delays by [[#Ticks|ticks]]. A line is divided into equal [[#Ticks|ticks]], the default value being 12. By using the Q8 command in the volume or panning column, the note is delayed by 8 [[#Ticks|ticks]]. | ||
| Line 246: | Line 239: | ||
We also have an Effect Command reference card available for download, available in four different versions: | We also have an Effect Command reference card available for download, available in four different versions: | ||
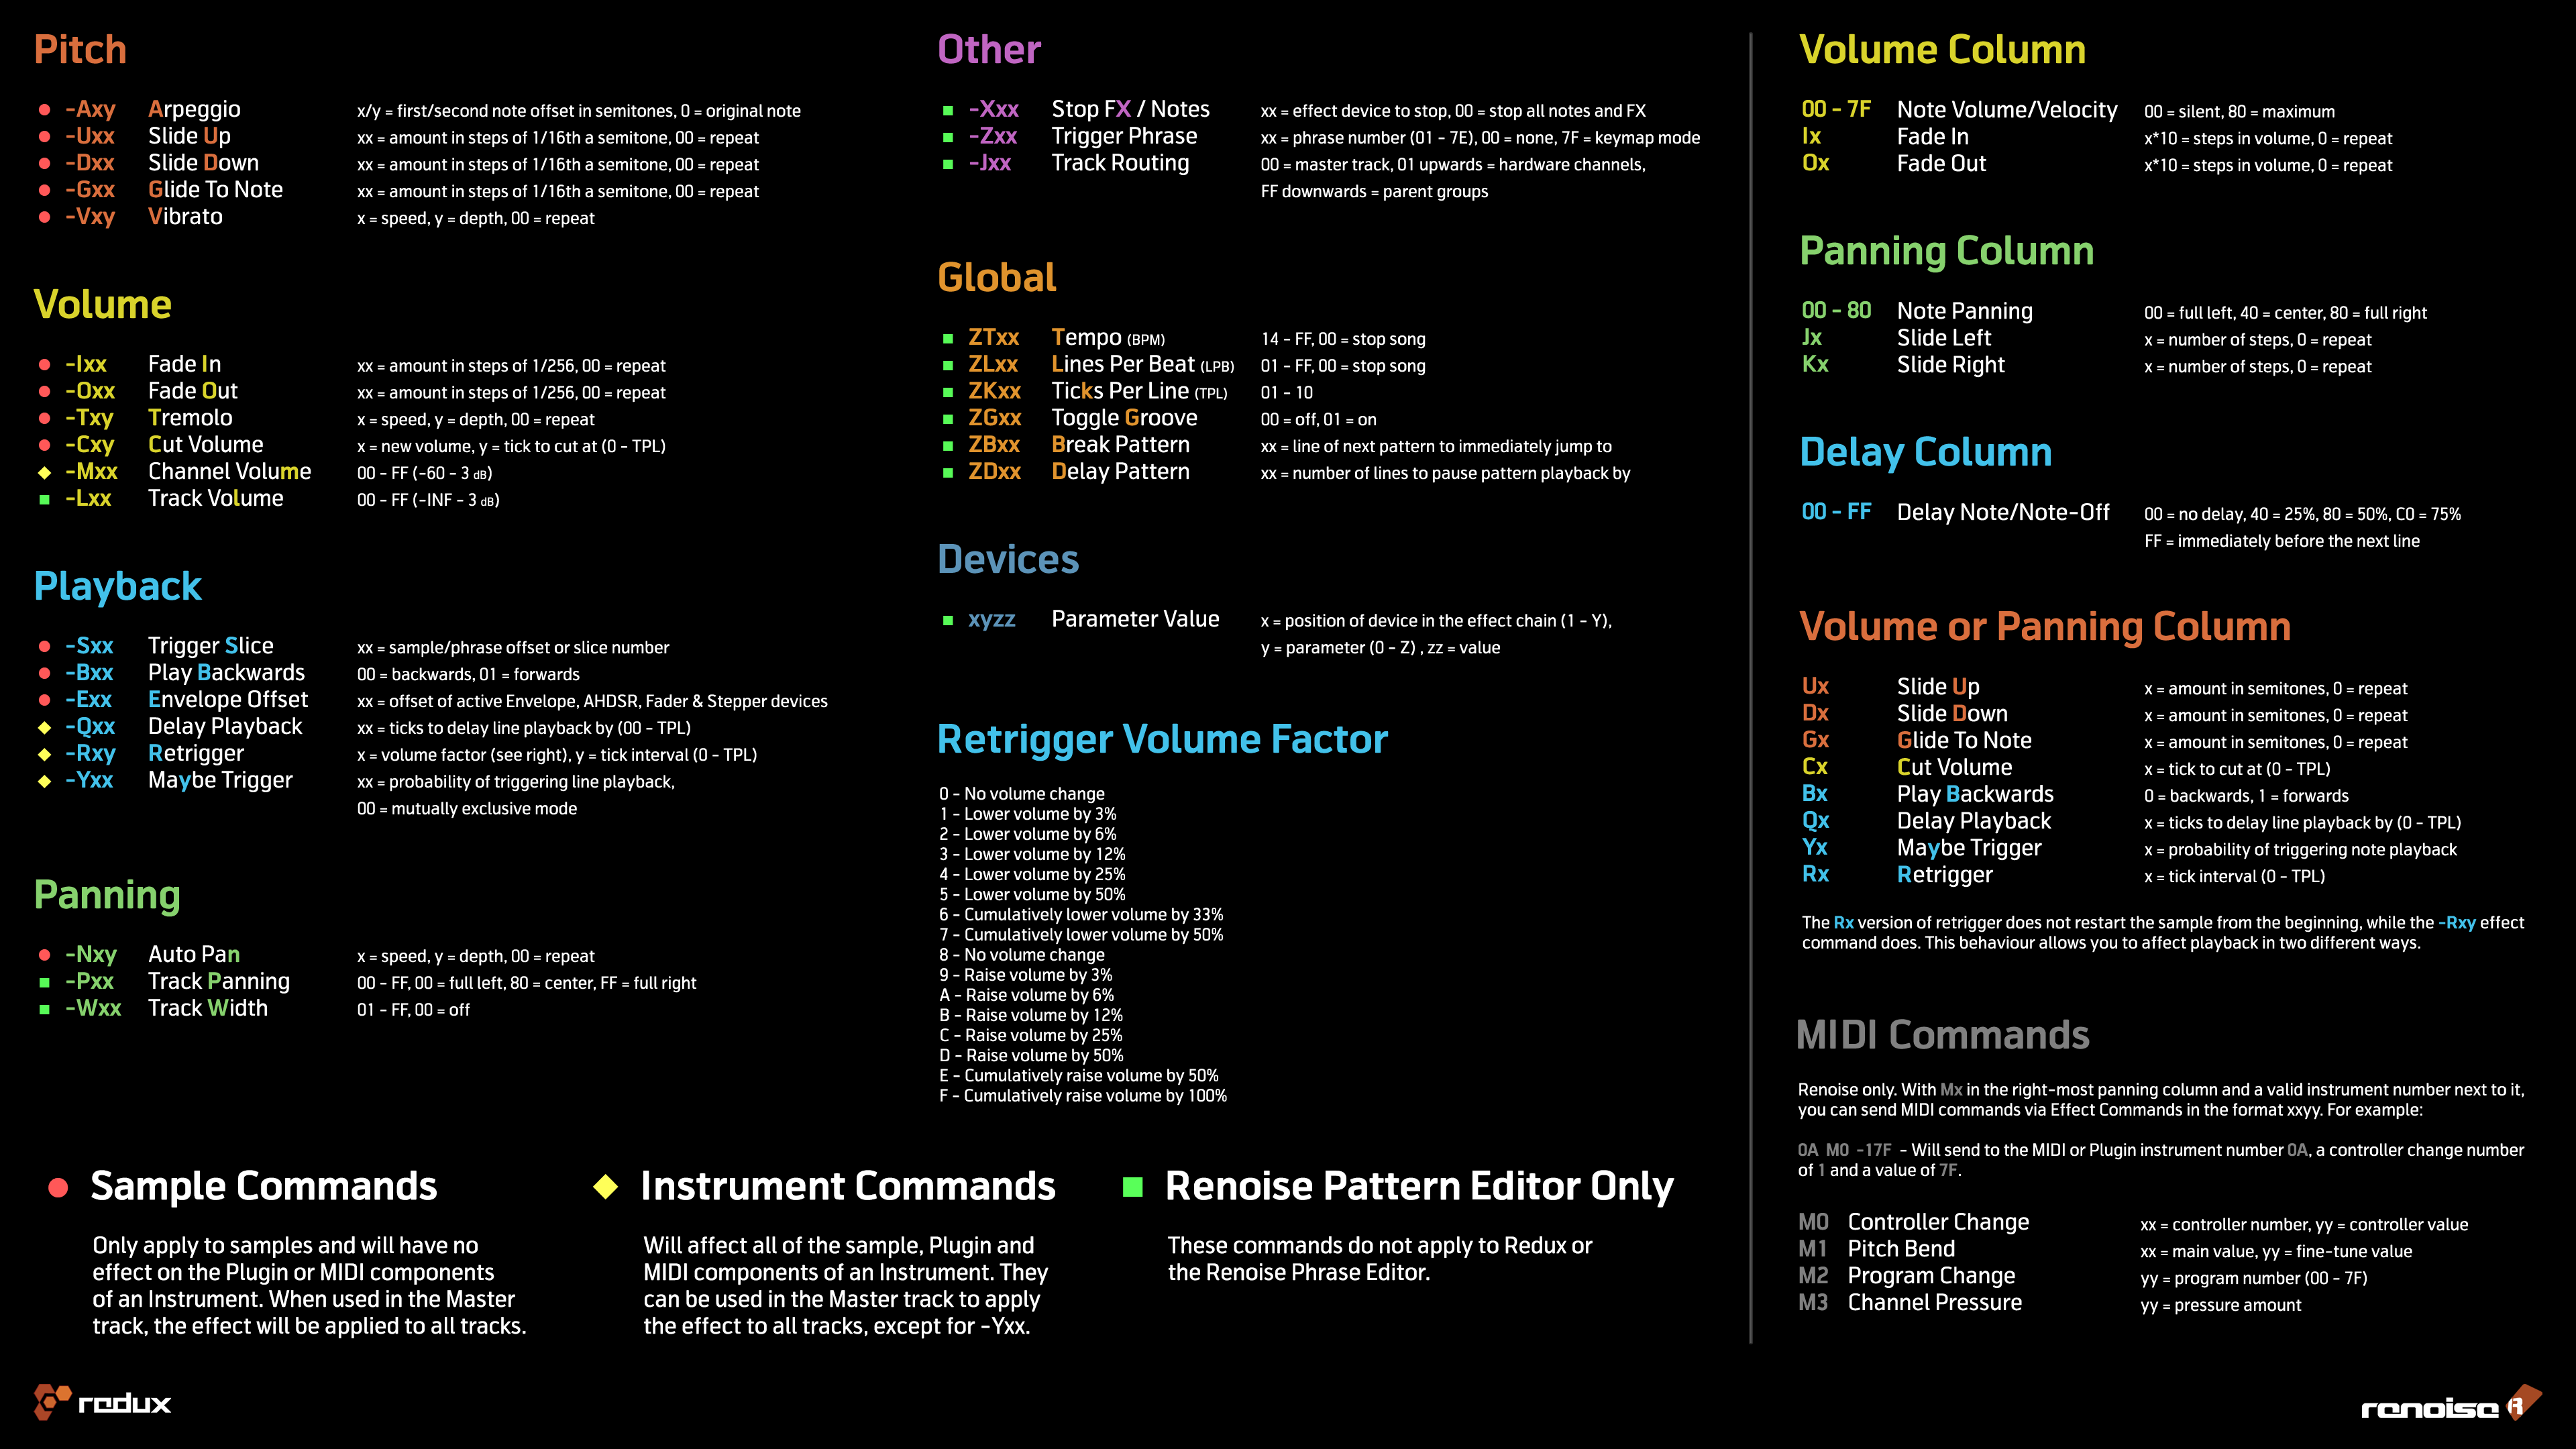
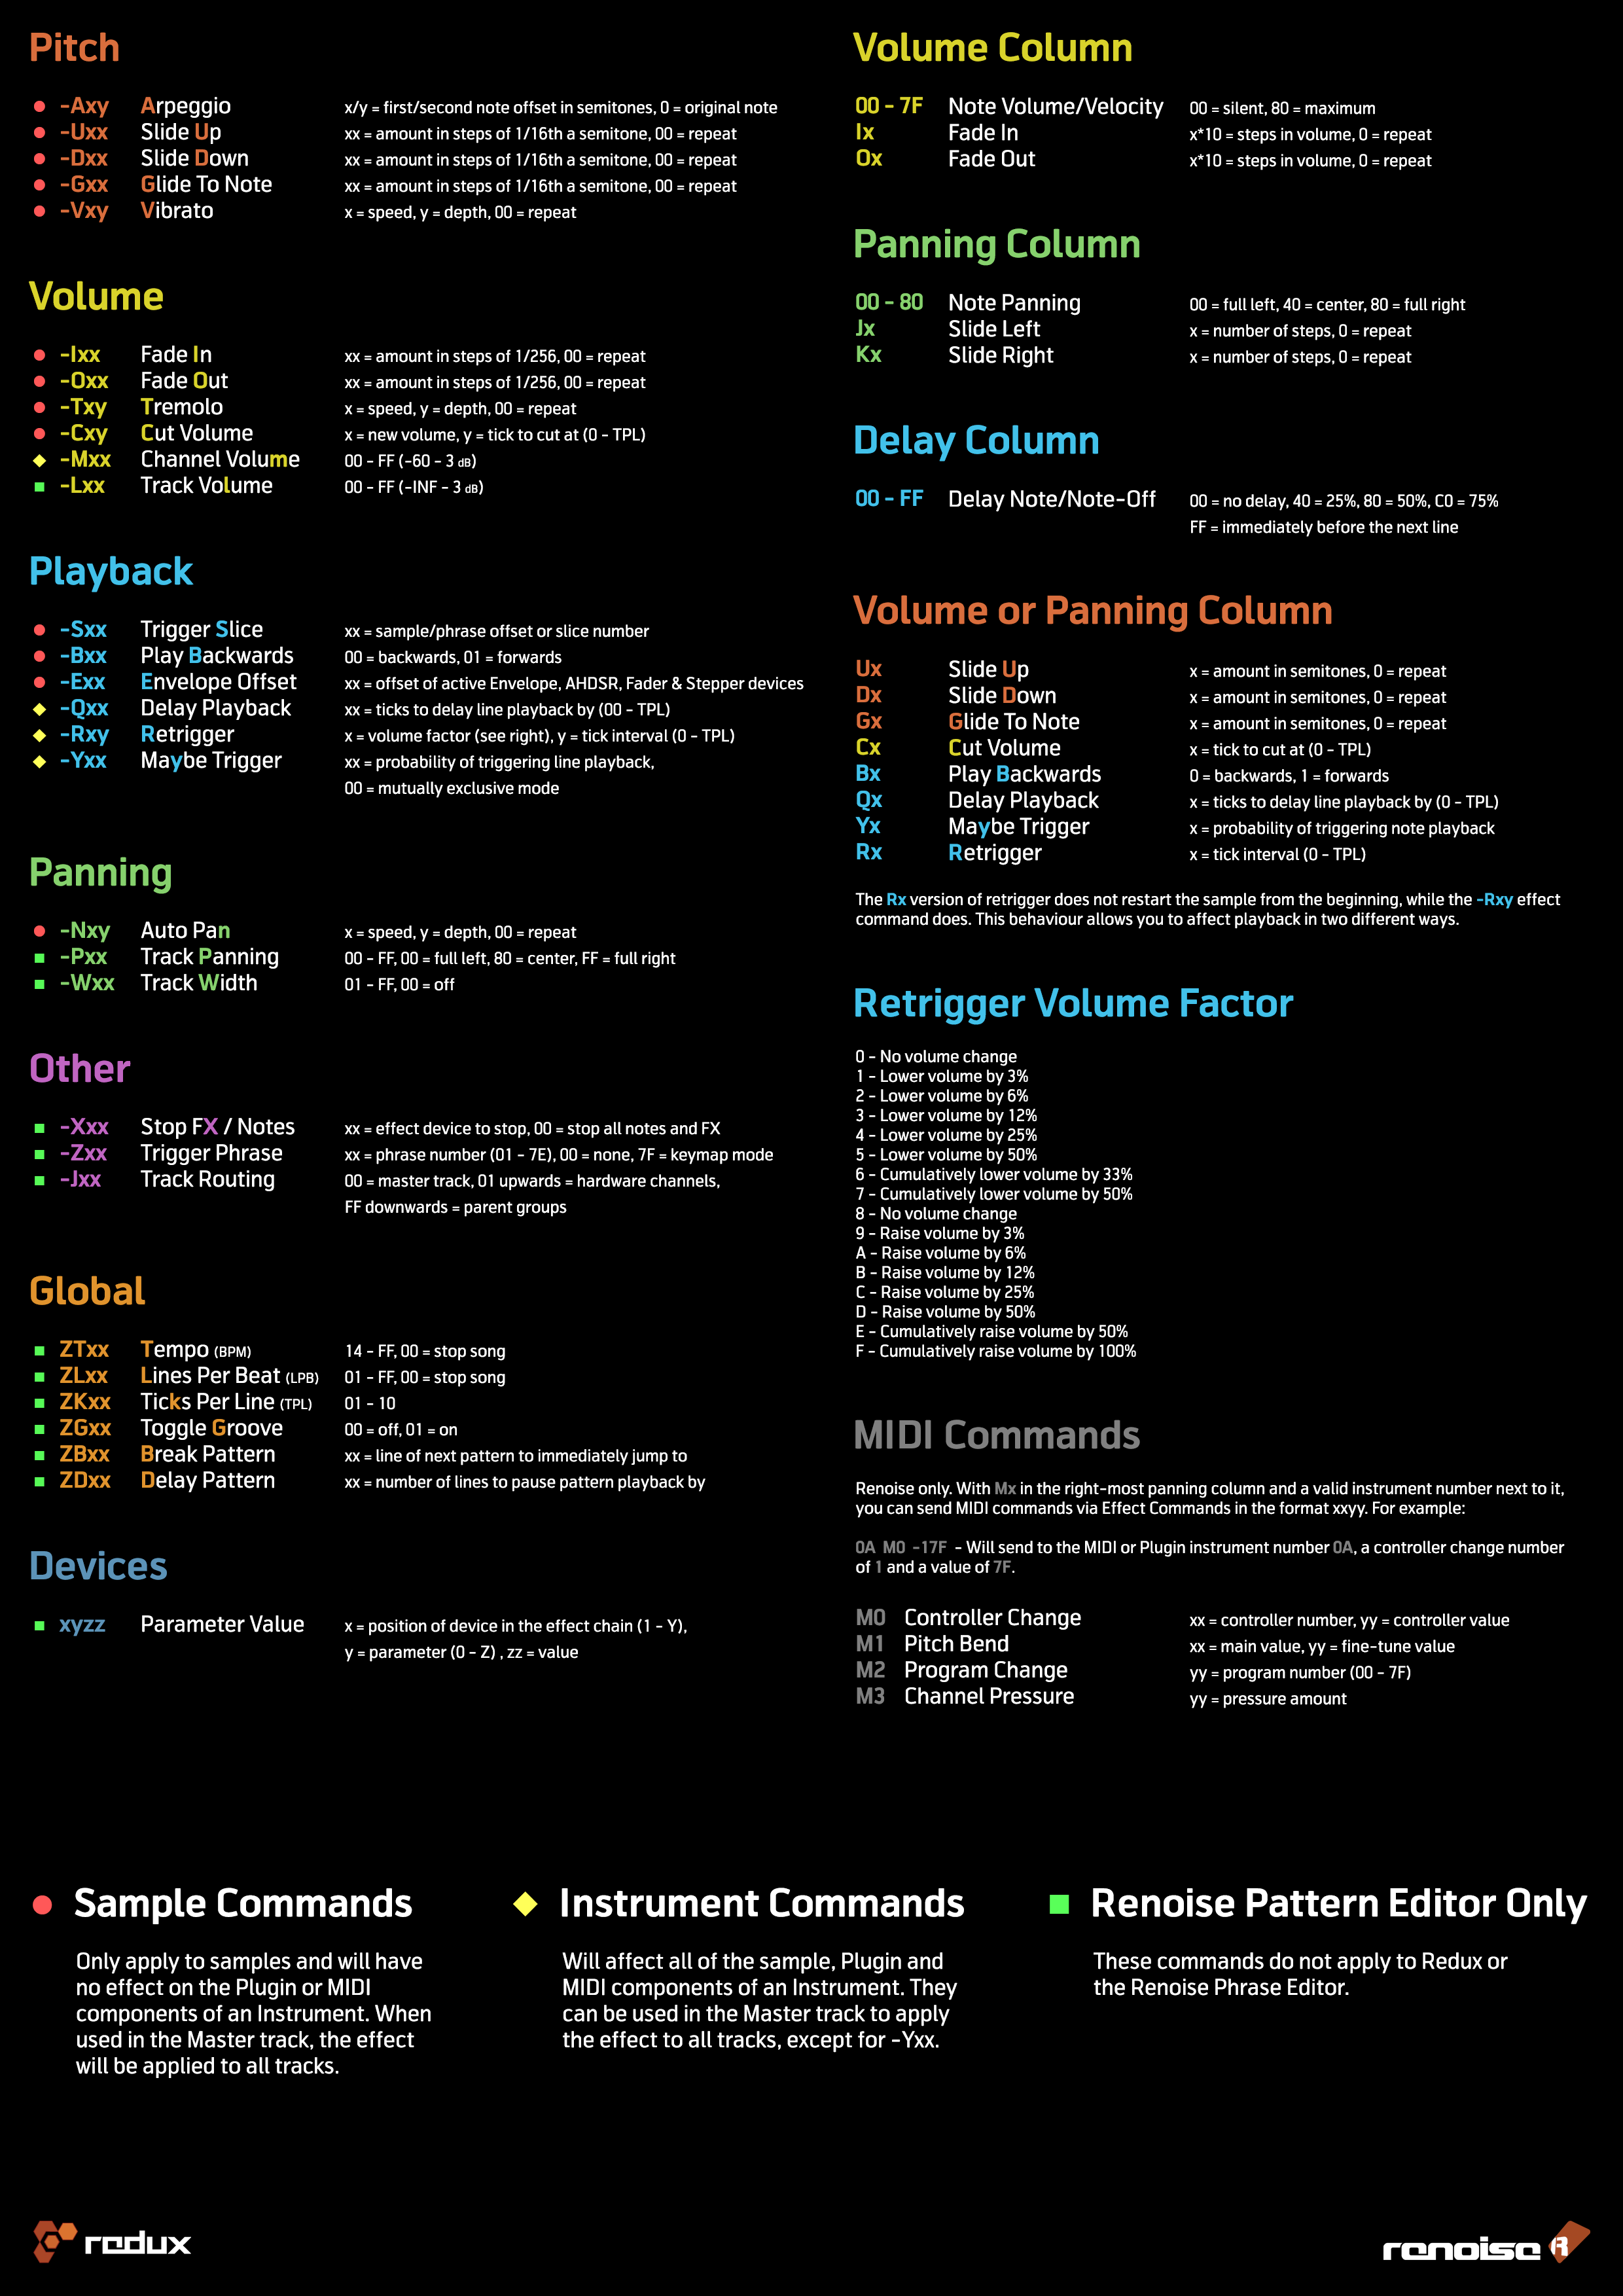
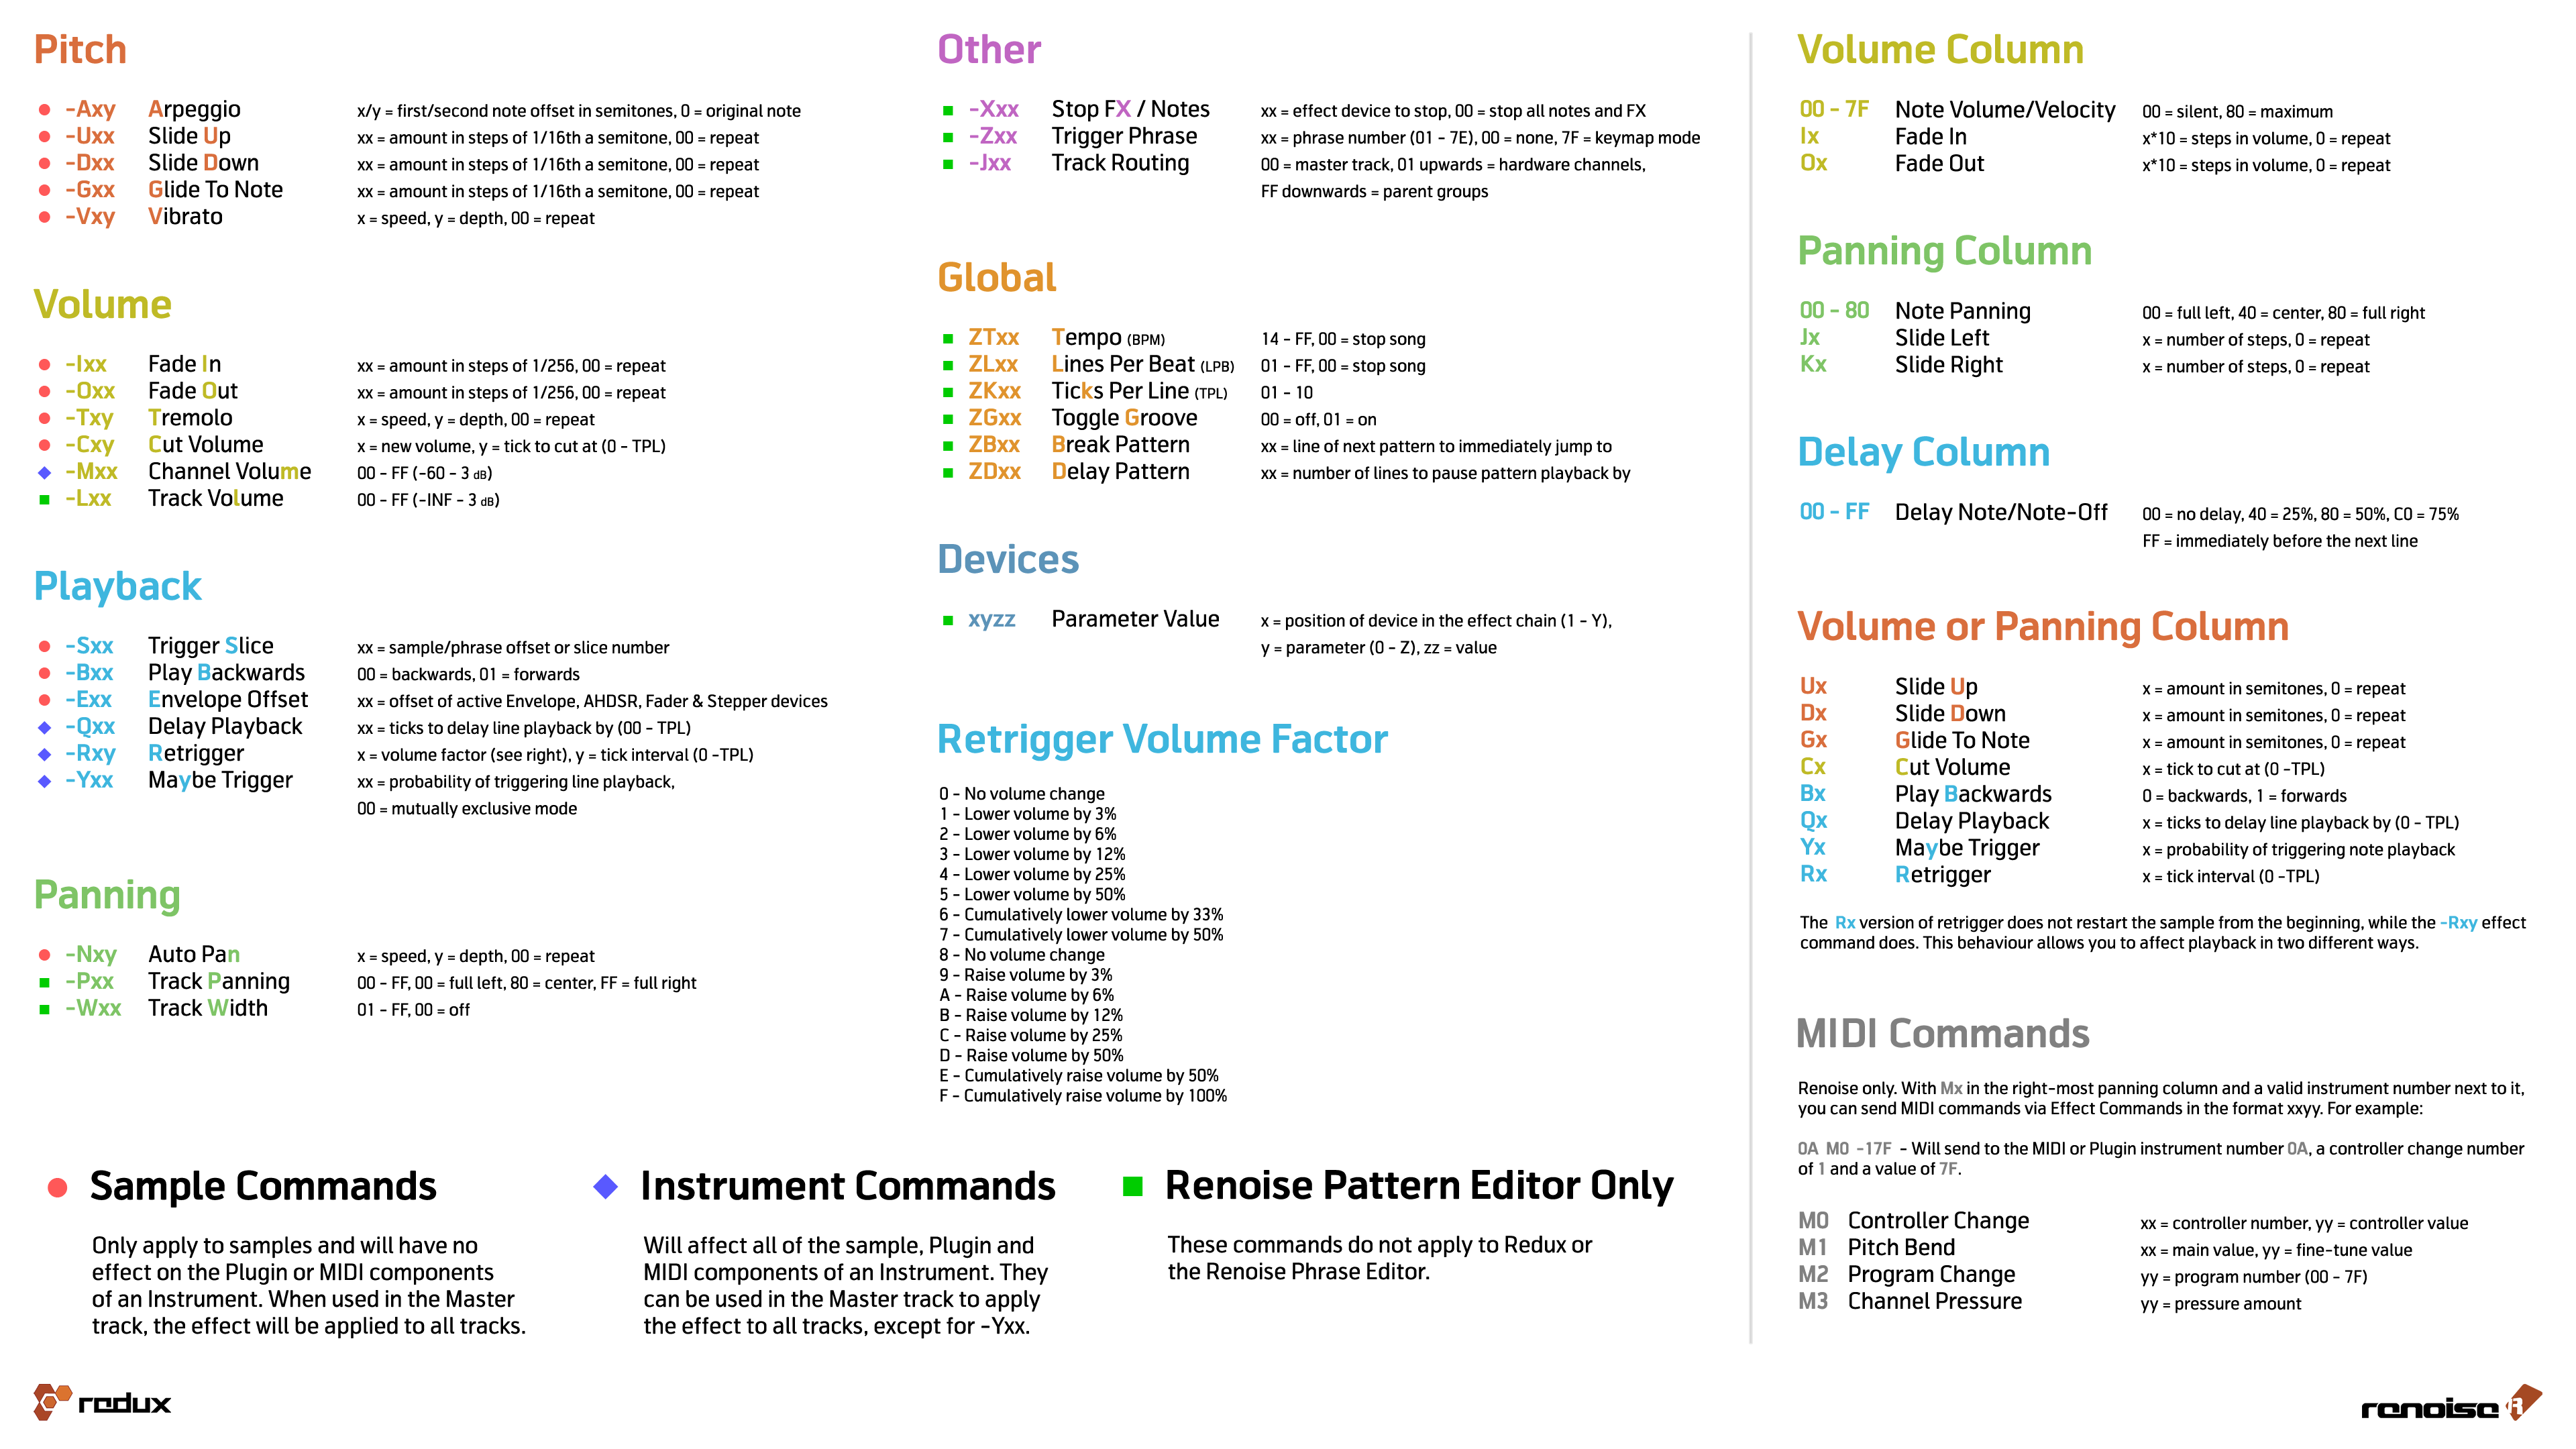
* [https:// | * [https://tutorials.renoise.com/images/5/56/Effect_Commands_16-9.png Screen 16:9] | ||
* [https:// | * [https://tutorials.renoise.com/images/d/d0/Effect_Commands_A4.png Screen A4] | ||
* [https:// | * [https://tutorials.renoise.com/images/1/1f/Effect_Commands_16-9_print.png Print 16:9] | ||
* [https:// | * [https://tutorials.renoise.com/images/0/00/Effect_Commands_A4_print.png Print A4] | ||
Latest revision as of 17:06, 20 July 2022
Effect Commands
Effect Commands are used in the Pattern Editor and Phrase Editor to perform a variety of tasks, from changing the volume of a single note, to automating the parameters of Track Effects, or controlling the song during playback. They also allow various direct manipulations of sample audio, which can only be done via Effect Commands and is a major feature that differentiates trackers from other DAWs. Examples include: starting the playback of a sample from the middle (S effect), then playing it in reverse (B effect), panning it fully to the left (pan column), then retriggering the waveform at its current position (R effect in the pan column) while simultaneously gliding to another note one octave down (G effect). All this can be easily and precisely achieved with Effect Commands.
You may find it useful to watch our 9-part "Effect Commands" video series, which provides explanations and demonstrations on this subject.
Recording and Editing Effect Commands
Effect Commands are recorded in Edit Mode with the Tracker Interface, so if you're unfamiliar with this method of working, you should read through that section of the manual before continuing here.
![]()
Values are entered using the row of numbers above the letters on the keyboard, not the number-pad, which is reserved for quickly switching between instruments in the Instrument Selector. Entering a value will place it at that exact digit in the column. For example, if you are at the first digit in the Volume column and press '4', the value will become '40'. If you want the value to be '48', then move the cursor over to the second digit using the arrow keys and press '8' there.
When recording an effect column value, the cursor automatically moves down to the next line. If you want the cursor to advance to the right instead, hold "Left Shift" while entering the values.
Ticks
Many Effect Commands make use of 'ticks', so it's important to understand the concept. Just as a pattern is split into a number of lines, so each line is split into a number of Ticks. A tick is when an update is made to certain things if they makes changes over the course of a line. The things affected are Effect Commands, interpolation between points in Graphical Automation and meta devices such as the LFO. In Renoise, this tick fraction is configurable with the Ticks Per Line parameter in the Song Options panel.
Ticks vs. Note Delays
As shown above, note columns have a delay sub-column, which lets you delay the note to the left of it on the same line. These delays do not use ticks, but instead always divide a line into 256 slices.
Effect Listing
- xx and xy are place-holders whose meanings are explained in the Effect Command descriptions. They should be replaced with values to create an effect. xx means both digits are one whole value. xy means that the x and y are separate values.
- All values shown below are hexadecimal.
- Similar effect styles are highlighted with the same colour (e.g. pitch up, down and glide are all red, though the exact colour depends on the current interface Theme).
- When typing commands into the pattern/phrase, a helpful summary about them will appear in the Lower Status Bar.
- The U, D, G, V, I, O, T and N commands will repeat the last valid value if a value of 00 is used. This way you can quickly enter a series of commands without having to continually type the exact value.
- You can use the small FX drop down menu as both a quick reference and an easy method of inserting commands:
 For phrases, this is found in the Phrase Editor options. For the Pattern Editor, this is in the control panel the bottom of the editor.
- We also have an Effect Command reference card available for download, available in four different versions:
Local & Master FX Effect Columns
Sample Commands
These commands only apply to samples and will have no effect on the Plugin or MIDI components of an Instrument. When used in the Master track, the effect will be applied to all tracks.
- -Axy - Set arpeggio, x/y = first/second note offset in semitones. Using 0 for x or y will use the original note.
- -Uxx - Slide pitch up by xx 1/16ths of a semitone (01 is 1/16th of a semitone, 08 is half a semitone, 10 is a whole semitone).
- -Dxx - Slide pitch down by xx 1/16ths of a semitone (01 is 1/16th of a semitone, 08 is half a semitone, 10 is a whole semitone).
- -Gxx - Glide towards given note by xx 1/16ths of a semitone (01 is 1/16th of a semitone, 08 is half a semitone, 10 is a whole semitone). A value of FF will make the slide instant.
- -Vxy - Set vibrato (regular pitch variation), x = speed, y = depth.
- -Ixx - Fade volume in by xx volume units (-I01 inserted 256 times will slide from 0 to full volume, -I7F inserted twice will do the same much faster).
- -Oxx - Fade volume out by xx volume units.
- -Txy - Set tremolo (regular volume variation), x = speed, y = depth.
- -Cxy - Cut volume to x after y ticks (x = volume factor: 0=0%, F=100%). Does not stop playback.
- -Sxx - Trigger sample slice number xx or offset xx.
- -Bxx - Play sample backwards (xx = 00) or forwards (xx = 01).
- -Exx - Set the position of all active Envelope, AHDSR, Fader and Stepper Modulation devices to offset xx.
- -Nxy - Set auto pan (regular pan variation), x = speed, y = depth.
Sample Command Variations (Renoise only)
A few commands will behave differently when used in the Pattern Editor to affect a phrase:
- -Sxx - Trigger phrase from line xx.
- -Bxx - Play phrase backwards (xx = 00) or forwards (xx = 01).
- -Ixx, -Oxx, -Txy - Will also affect the volume of any Plugin or MIDI playing in the phrase.
Instrument Commands
These commands will affect all of the sample, Plugin and MIDI components of an Instrument. They can be used in the Master track to apply the effect to all tracks, except for -Yxx and -Zxx.
- -Mxx - Set channel volume level, 00 = -60dB, FF = +3dB.
- -Zxx - Trigger phrase number xx (01 - 7E, 00 = no phrase, 7F = keymap mode).
- -Qxx - Delay playback of the line by xx ticks (00 - TPL).
- -Yxx - MaYbe trigger the line with probability xx. 00 = mutually exclusive mode (will trigger only one note on this line, where the chance of triggering is inserted into the Local FX column, or the volume or panning column using Yx).
- -Rxy - Retrigger instruments that are currently playing. This is done every y ticks with volume factor x applied to each retrigger, where x represents:
- 0 - No volume change
- 1 - Lower volume by 3%
- 2 - Lower volume by 6%
- 3 - Lower volume by 12%
- 4 - Lower volume by 25%
- 5 - Lower volume by 50%
- 6 - Cumulatively lower volume by 33%
- 7 - Cumulatively lower volume by 50%
- 8 - No volume change
- 9 - Raise volume by 3%
- A - Raise volume by 6%
- B - Raise volume by 12%
- C - Raise volume by 25%
- D - Raise volume by 50%
- E - Cumulatively raise volume by 50%
- F - Cumulatively raise volume by 100%
Device Commands
Only applies to the Renoise Pattern Editor. These commands specifically target the track's effect devices.
- -Lxx - Set track pre-mixer's volume level, 00 = -INF, FF = +3dB.
- -Pxx - Set track pre-mixer's panning, 00 = full left, 80 = center, FF = full right.
- -Wxx - Set track pre-mixer's surround width, 00 = off, FF = max.
- -Xxx - Stop all notes and FX (-X00), or a specific effect (-Xxx, where xx > 00).
- -Jxx - Set track's output routing to channel xx, 01 upwards = hardware channels, FF downwards = parent groups (00 is the master track, 01 is the first soundcard output channel and FF is the closest parent group track).
You can also change any Track Effect parameter with Effect Commands by using the first digit to target a specific device in the effect chain:
- xyzz - x is the xth device in the effect chain, y is the yth parameter in the device. For example: if you have a Distortion device as the first effect in the chain, then 13FF will set the Distortion's Tone parameter to the maximum value (1 = Distortion device (the first effect), 3 = Tone (the third parameter), FF = maximum value).
You can also enable and disable specific effect devices with the following commands:
- x000 - Turn effect x off.
- x001 - Turn effect x on.
Moving a device's slider will also show the Effect Command in the Lower Status Bar. Right-clicking a slider will automatically record the parameter changes into the track's Master FX Column when pattern Automation recording mode is set record into the pattern.
Global Commands
Only applies to the Renoise Pattern Editor. These commands control the song during playback.
- ZTxx - Set tempo (BPM) (14 - FF, 00 = stop song)
- ZLxx - Set Lines Per Beat (LPB) (01 - FF, 00 = stop song).
- ZKxx - Set Ticks Per Line (TPL) (01 - 10).
- ZGxx - Toggle song Groove on/off (00 = turn off, 01 or higher = turn on).
- ZBxx - Break pattern. The current pattern finishes immediately and jumps to next pattern at line xx (remember that although this value is hexadecimal pattern lines are usually displayed as decimals).
- ZDxx - Delay (pause) pattern playback by xx lines.
Volume Column
- 00-7F - Set note volume/velocity where 00=minimum and 80=maximum. This can also be used for polyphonic after-touch in VST/MIDI instruments that support it.
- Ix - Volume fade in in the current note column, with step x*10 (I1 = -I10 in effect column, I2 = -I20, etc.)
- Ox - Volume fade out in the current note column, with step x*10 (O1 = -O10, O2 = -O20, etc.)
Panning Column
- 00-80 - Set panning of current note column: 00 = full left, 40 = center, 80 = full right.
- Jx - Panning slide left with step x (0 - F).
- Kx - Panning slide right with step x (0 - F).
Volume or Panning Column
- Ux - Slide pitch up by x semitones.
- Dx - Slide pitch down by x semitones.
- Gx - Glide towards given note by x semitones. A value of F will make the slide instant.
- Cx - Cut the note after x ticks (0 - F). Unlike -Cxy this stops playback (without triggering a Note-Off) and will affect Plugin & MIDI.
- Bx - Play sample in the current note column backwards (0 is backwards, 1 is forwards again).
- Qx - Delay a note by x ticks (0 - F).
- Yx - MaYbe trigger note with probability x.
- Rx - Retrigger a note every x ticks (0 - F).
Note: The panning/volume Rx version of retrigger does not restart the sample from the beginning, while the -Rxy effect command does. This behaviour is intended to give you a choice of two different retrigger modes.
Delay Column
- 00-FF - The delay column can only be used to delay a note or Note-Off, where 00 is no delay and FF will result in the note being delayed until immediately before the next line. For example:
- 40 - 25% delay
- 80 - 50% delay
- C0 - 75% delay
- 40 - 25% delay
MIDI Commands
Renoise only. With Mx in the right-most panning column and a valid instrument number next to it, you can send MIDI commands via Effect Commands in the format xxyy. For example:
--- 0A M0 -17F -> Will send to the MIDI or Plugin instrument number 0A, a controller change number of 1 and a value of 7F
- M0 - Controller change message, xx = controller number, yy = controller value.
- M1 - Pitch bend, xx = main value, yy = fine-tune value.
- M2 - Program change, yy = program number (00 - 7F).
- M3 - Channel pressure (monophonic after-touch), yy = pressure amount.

Note: Insert the Mx MIDI commands in the panning column of the right-most note column. MIDI commands show a different syntax colour than when they function as panning values and a -000 value is automatically filled in on the effect column.
Take care that you also add the instrument number, so that Renoise knows which MIDI instrument the command will be targeting.
MIDI and plugin instruments can also be automated through *Instrument MIDI Control or *Instrument Automation devices.
Entering Multiple Digit Values with the Computer Keyboard
By default, when entering values with the computer keyboard, a single digit value will be placed and the cursor will immediately move down within the Pattern Editor (by the number of lines specified by the Edit Step). If you want to enter multiple digit values in a single line without this occurring, this can be achieved by holding down "Left Shift" while entering the values. This works individually with the Volume, Panning, Delay and each of the Effect columns.
Effect Examples
Some very basic sample command examples to get started:
Pitch Slide

1. Pitch slide up -Uxx: Sound file (mp3)
From line 00 to 07, the sample is pitched up at a constant rate of 20 (hexadecimal notation), where 00 means "repeat the previous value".
2. Glide to note -Gxx: Sound file (mp3)
The first note is played at C-4. At line 04 the pitch rises at a constant rate of 20 (hexadecimal notation) towards A-4. Once the glide reaches reaches the desired pitch of A-4, subsequent G commands are ignored.
Breakbeat Tricks

1. Original Loop: Sound file (mp3)
2. Sample offset -Sxx: Sound file (mp3)
The offset command works by splitting a sample into 256 equal parts. The larger the sample, the more inaccurate this command will be. As the range of values is 00 to FF, -S80 plays the sample from halfway through and -S40 plays the sample from one quarter of the way through.
3. Retrigger note Rx: Sound file (mp3)
This effect replays the sample very quickly at its current position in the waveform playback. x sets how many ticks to count before retriggering the sample again. By default, there are 12 ticks per line. Setting R4 will retrigger a sample 3 times per line (12÷4=3).
4. Reverse sample B0, B1: Sound file (mp3)
B0 plays the sample backwards from that point. B1 resumes normal playback.
Programming Delays
Here are two techniques for programming a delay:

1. Delay note Qx: Qx delays by ticks. A line is divided into equal ticks, the default value being 12. By using the Q8 command in the volume or panning column, the note is delayed by 8 ticks.
2. Using the Delay Column: The Delay Column divides a line into 256 equal parts and so is much more precise than ticks. Use this column to get more accuracy.
Effect Commands Quick Reference Card
We also have an Effect Command reference card available for download, available in four different versions: