|
|
| Line 1: |
Line 1: |
| = Effect Chains = | | == Doofer & Splitter == |
|
| |
|
| Effects can be applied in two ways: [[Effects|directly onto samples]], affecting only those sounds, or ''(Renoise only)'' inserted into [[Pattern Editor#Track Types|tracks]], affecting all sounds that are played there. Either way, devices are inserted into an interactive effect chain, with the audio signal running through each device from left to right. The devices can be chosen from the pool of native effects or ''(Renoise only)'' any [[Plugin Effects|third-party plugin]].
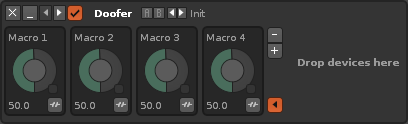
| | Doofers and Splitters enable the bundling of complex effect chains within a single device and provide easy access to the most useful parameters through macros. Automating a macro will change the values of all assigned parameters. |
|
| |
|
| The native devices come in four different categories. [[Audio Effects]] alter the sound in a variety of ways. [[Meta Devices]] do not change the actual audio signal themselves, but instead alter the parameters of another effect. [[Routing Devices]] either send audio to another FX Chain/track or receive a signal from an external source. [[Doofers]] are special devices that contain their own effect chain within them and provide easy access to their most useful parameters through macros.
| | [[Image:3.5_fx-doofer.png]] |
|
| |
|
| A song or instrument created using only these native effects can be saved and given to other people, where it will play back on their copy of Renoise/Redux exactly as it did on yours. ''Renoise only: However, if [[Plugin Effects|plugin effects]] or [[Plugin|plugin instruments]] (VST, AU, LADSPA, DSSI) are used, these external programs must also be installed on their system, otherwise they won't be played.''
| | To begin crafting your own Doofer or Splitter, add it to the effect chain then drag and drop another effect into it on the right side of the device. You can keep adding as many effects as you like this way. |
|
| |
|
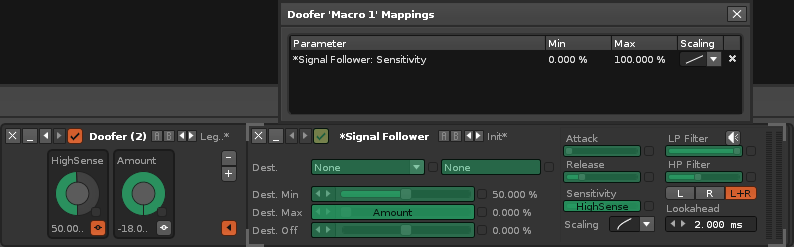
| [[Image:3.2_trackeffects.png]] | | To map effect parameters to a macro, click the [[Image:3.2_sampler-macrosmap.png|text-bottom]] button to open the mappings list and reveal any mappable parameters – they’re shown here as green, but the highlighted colour may vary according to the [[Preferences#Theme|current interface Theme]]. Clicking on a parameter will add it to the list, where you can specify its Min/Max values and Scaling. Pressing the X at the right will delete the mapping. |
|
| |
|
| | [[Image:3.5_fx-doofer-macromap.png]] |
|
| |
|
| == The Effects List ==
| | * To rename a macro, just click on its name. Effects can renamed by double-clicking the name. |
| | * Once you've finished mapping, you may find it useful to [[Effect_Chains#Common_Device_Layout_and_Controls|minimize]] some or all of the devices. |
| | * If you need to add or remove macros, use the [[Image:3.5_instrumentselector-insert.png|text-bottom]] and [[Image:3.5_instrumentselector-delete.png|text-bottom]] buttons. |
| | * Toggling the [[Image:3.5_fx-doofer-edit.png|text-bottom]] Edit button off closes the effect chain and prevents further editing. |
|
| |
|
| If you're adding effects to samples: In Renoise make sure you're in the [[Effects|Sampler -> Effects]] section. In Redux, just click on the Effects tab.
| | Saving a Doofer or Splitter as a preset will save it and all contained devices as a native effect. It will be added to the [[Effect_Chains#The_Effects_List|effect list]] under the Doofers/Splitters section, where you can add it to a track just like you would with any other device. Exporting a Doofer or Splitter allows you to share it with other people - though of course if it contains any [[Plugin Effects|non-native plugins]], then those will need to be installed on their system as well. |
|
| |
|
| If you're adding effects to a track in Renoise, use the effect list in the [[Pattern Editor]] by selecting its icon at the lower left corner of the interface: [[Image:3.2_lowerstatusbar-trackeffects.png|text-bottom]]
| | You may find it useful to watch [https://youtu.be/V0N-T3k_jCA a short video on this subject]. |
|
| |
|
| Note that when the [[Mixer]] has been detached as a separate window the entire Track Effects panel and its button are moved with it.
| | === Splitter Differences === |
|
| |
|
| Either way, the list of available effects is found at the bottom left and is categorised like so:
| | [[Image:3.5_fx-splitter.png]] |
|
| |
|
| * Native
| | A Splitter works just like a Doofer, but has the additional ability of splitting the signal into two sub-signals, each with their own effect chain. Adding effects and setting up macros works just as shown above, while the sub-chain controls are as follows: |
| ** [[Audio Effects]]
| |
| ** [[Meta Devices]]
| |
| ** [[Routing Devices]]
| |
| ** [[Doofers]]
| |
| * ''(Renoise only)'' VST/VST3/AU/LADSPA/DSSI - ''note that VST & VST3 plugins are split into separate categories''
| |
| ** [[Plugin Effects]]
| |
|
| |
|
| You can quickly search for an effect by typing part of its name in the search bar at the top of the list. This also works for categories, so typing in "VST" will show only VST plugins in the list. To add a device from the list to the effect chain, either double-click on it or drag and drop it into the chain at the desired position.
| | * '''Type''' - The sub-signals can be one of three types: |
| | ** '''Parallel:''' Two identical copies. |
| | ** '''Mid/Side:''' Separated mid/side spatial ranges. |
| | ** '''Frequency:''' Automatable low/high frequency ranges. |
| | * '''Chain:''' Toggles between the two sub-chains, allowing the user to view and edit the effects. Enabling the [[Image:3.5_fx-meta-signalfollowerhear.png|text-bottom]] button will solo the selected Chain, playing only its audio. |
| | * '''Gain 1/2:''' Post volume gain of the sub-chains. |
| | * '''Frequency:''' ''(Frequency Type only)'' The point of separation between the Low and High ranges. |
|
| |
|
| '''Renoise only''' - You can also drag and drop an effect into any track while using the [[Mixer]]: | | '''Tips and Tricks''' |
|
| |
|
| [[Image:3.0_effects-trackfxmixer.png]]
| | * The Frequency parameter can be automated, making it a powerful creative tool. |
| | * Meta devices can work across sub-chains, allowing the user to modulate or control parameters in the opposing effect chain. |
| | * Doofers can contain other Doofers, and Splitters can do the same. This allows the audio signal to be split off into multiple nested layers, each affecting the audio in different ways and passing it on to the next split layer. |
|
| |
|
| '''Renoise only''' - Note that although [[Plugin Effects|plugin effects]] and [[Plugin|plugin instruments]] may have the same format name i.e. VST, they are still fundamentally different. Plugin effects will show up in the effects list shown here, while plugin instruments are handled in the [[Plugin]] section of the Instrument Editor.
| | == Notepad == |
|
| |
|
| === Organizing the List ===
| | The Notepad is an incredibly simple device used to write notes and place them within effect chains. You may perhaps use them to remind yourself, or inform others, of the functionality of a particular effect chain. They come in especially handy for Doofers and Splitters where effects are often minimised and short [[Effect_Chains#Common_Device_Layout_and_Controls|device names]] may not be informative enough. |
|
| |
|
| By default, the plugin effects list is sorted by vendor name. Clicking the "More" button next to the search field will vertically expand the list, giving you more room to organise the effects.
| | [[Image:3.5_fx-utilities-notepad.png]] |
|
| |
|
| Right-clicking on a plugin or vendor/group name will bring up a context menu with the following options:
| | To write notes, simply click in the text field and start typing. Text editing can be prevented by [[Effect_Chains#Common_Device_Layout_and_Controls|disabling the device]]. |
| | |
| * '''Add To Favorites:''' Adds the selected plugin or vendor to your [[#Favorites List|favorites list]].
| |
| | |
| * '''Add To Group:''' ''(Renoise only)'' Opens a new dialog box where you enter a name for the group. If it is a new name, then the group will be created and the selected plugin(s) moved under it. If the group already exists, then the plugin(s) will be moved over to the group.
| |
| * '''Ungroup:''' ''(Renoise only)'' ''(Only available when clicking on an existing group or vendor name)'' Removes the selected group from the effects list.
| |
| | |
| * '''Rename:''' ''(Renoise only)'' ''(Unavailable for native effects)'' Opens a new dialog box where you can change the plugin or vendor name. Any changes made here will only be saved within Renoise; the actual plugin name remains the same, since it may be used by other applications.
| |
| * '''Hide:''' Excludes a plugin or a category of plugins from the list. This can be useful if you no longer use a plugin, but don't want to uninstall it because old songs still use it. To make a hidden plugin visible again, enable the ''"Show Hidden Devices"'' option, then simply ''"Unhide"'' it again.
| |
| | |
| * '''Collapse Whole Tree:''' Collapses the entire effects list, showing only the Favorites (if any exist), Native and VST/AU/LADSPA/DSSI categories. Handy if you need to show just a few effects.
| |
| * '''Expand Whole Tree:''' The effects list will expand back to its full size again.
| |
| | |
| * '''Show Hidden Devices:''' Enables hidden plugins to become visible again.
| |
| * '''Show Short Names:''' Instead of sorting plugins by vendor, you can also display them as a single list. With this option enabled you can still categorise the plugins by renaming them as described above.
| |
| | |
| === Favorites List ===
| |
| | |
| To add a plugin to your custom favorites list, click the star icon to the right of it. Your favorites are located at the very top of the effects list. To remove a plugin from your favorites, simply click the star icon again.
| |
| | |
| <!-- RENOISE_NO_PDF_START -->
| |
| [[Image:3.0_effects-favorites.gif]]
| |
| <!-- RENOISE_NO_PDF_STOP -->
| |
| | |
| == Common Device Layout and Controls ==
| |
| | |
| Each effect device has a standard set of buttons to perform common functions:
| |
| | |
| * [[Image:3.0_device-remove.png|text-bottom]] - Remove the device from the chain.
| |
| * [[Image:3.0_device-minmax.png|text-bottom]] - Minimize/maximize the device.
| |
| * [[Image:3.0_device-move.png|text-bottom]] - Move the device to the left or right. Right-click to move to the start or end of the chain.
| |
| * [[Image:3.0_device-enable.png|text-bottom]] - Enable/disable the device.
| |
| * [[Image:3.1_device-rename.png|text-bottom]] - Double click on the device name to rename it.
| |
| | |
| | |
| == Storing/Recalling Effect Presets ==
| |
| | |
| * [[Image:3.0_device-ab.png]] - Right-clicking on the A or B button will store the current set of parameter values. If the parameters are then changed to something else, left-clicking will restore them back to the stored values. Storing to both A and B allows you to quickly switch between two different presets and compare them. Any presets stored like this are saved with your song, so you don't need to worry about losing them.
| |
| * [[Image:3.0_device-preset.png]] - Select, edit or create presets for this effect. Clicking the preset name shows a list of available presets, along with some options:
| |
| | |
| [[Image:3.0_device-presetmenu.png]]
| |
| | |
| By choosing ‘Save As...’ from the menu and entering a name, the current parameters will be saved as a new preset in the [[Libraries|User Library]]. The presets will show up every time you use the effect device in future across both Renoise & Redux because they’re compatible and share their data from this same User Library.
| |
| | |
| To save/load parameter presets to/from disk, use the ''"Import"'' and ''"Export"'' options in the same context menu. This method allows you to share your presets with other users.
| |
| | |
| Finally, when they’ve been selected from the menu, user created presets can also be renamed and deleted.
| |
| | |
| | |
| == Pre and Post Mixer Effects ==
| |
| | |
| Two devices are always present in every effect chain and cannot be removed or repositioned: the Pre and Post-Mixer devices.
| |
| | |
| [[image:3.0_device-premixer.png]]
| |
| | |
| The Pre-Mixer device is located at the beginning of each effect chain and controls the routing, volume, panning of the incoming signal, and in Renoise it also controls the width and delay.
| |
| | |
| '''Renoise only''' - In the [[Pattern Editor]]'s [[Pattern Editor#Tracks|standard Tracks]], this is normally the audio from the notes in that track, though [[Sampler_Effects#Output_Routing|Output Routing]] can change this. For [[Pattern Editor#Group Tracks|Groups]], [[Pattern Editor#Send Tracks|Sends]] and the [[Pattern Editor#Master Track|Master Track]], this is the audio that is being routed to them.
| |
| | |
| [[Image:3.0_device-postmixer.png]]
| |
| | |
| The Post-Mixer is located at the end of the effect chain and controls the volume and panning of the sound that leaves it.
| |
| | |
| '''Renoise only''' - The Post-Mixer device in the [[Pattern Editor#Master Track|Master Track]] has a few extra options to help manage the master signal:
| |
| | |
| [[Image:3.0_device-postmixermaster.png]]
| |
| | |
| * '''DC Filter:''' When enabled, any DC offset in the master signal will be automatically removed.
| |
| * '''Soft Clipping:''' When enabled, the master signal will be softly saturated when clipping occurs.
| |
| * '''Auto Gain:''' Automatically lowers the master volume when clipping occurs. This is the same as the [[Main Screen#Upper Status Bar|Upper Status Bar]]'s auto gain button: [[Image:3.2_upperstatusbar-autogain.png]]
| |
| * '''Peak Levels:''' Shows the actual master signal. Using this you can easily see if the master signal is clipping and by how much.
| |
| | |
| | |
| == Copy/Pasting Effect Chains ==
| |
| | |
| Right clicking on a device or into the free space between the effects will show a context menu with various options for the whole chain, or the currently selected chain. This way you can delete, cut, copy or paste whole chains, or min/maximize all effects in the current chain. Please have a look at the following screenshot for all available options:
| |
| | |
| [[Image:3.0_device-contextmenu.png]]
| |
| | |
| | |
| == Loading/Saving Effect Chains ==
| |
| | |
| It is possible to export effect chains to disk for later use through the ''"Other"'' category in the [[Disk Browser]]. Beware when loading an effect chain though, that the existing chain will be replaced with the new one. You can avoid this by right-clicking the chain file in the Disk Browser and then selecting, ''"Load file with options..."''.
| |
| | |
| | |
| == MIDI Mapping and Automating Effects ''(Renoise Only)'' ==
| |
| | |
| The [[MIDI Mapping]] feature can be used to bind an effect parameter to a hardware MIDI controller, which is incredibly useful for recording and playing live. The parameters can also be automated using either [[Graphical Automation]] or [[Effect Commands]].
| |
Doofer & Splitter
Doofers and Splitters enable the bundling of complex effect chains within a single device and provide easy access to the most useful parameters through macros. Automating a macro will change the values of all assigned parameters.
To begin crafting your own Doofer or Splitter, add it to the effect chain then drag and drop another effect into it on the right side of the device. You can keep adding as many effects as you like this way.
To map effect parameters to a macro, click the  button to open the mappings list and reveal any mappable parameters – they’re shown here as green, but the highlighted colour may vary according to the current interface Theme. Clicking on a parameter will add it to the list, where you can specify its Min/Max values and Scaling. Pressing the X at the right will delete the mapping.
- To rename a macro, just click on its name. Effects can renamed by double-clicking the name.
- Once you've finished mapping, you may find it useful to minimize some or all of the devices.
- If you need to add or remove macros, use the
 and
and  buttons.
- Toggling the
 Edit button off closes the effect chain and prevents further editing.
Saving a Doofer or Splitter as a preset will save it and all contained devices as a native effect. It will be added to the effect list under the Doofers/Splitters section, where you can add it to a track just like you would with any other device. Exporting a Doofer or Splitter allows you to share it with other people - though of course if it contains any non-native plugins, then those will need to be installed on their system as well.
You may find it useful to watch a short video on this subject.
Splitter Differences

A Splitter works just like a Doofer, but has the additional ability of splitting the signal into two sub-signals, each with their own effect chain. Adding effects and setting up macros works just as shown above, while the sub-chain controls are as follows:
- Type - The sub-signals can be one of three types:
- Parallel: Two identical copies.
- Mid/Side: Separated mid/side spatial ranges.
- Frequency: Automatable low/high frequency ranges.
- Chain: Toggles between the two sub-chains, allowing the user to view and edit the effects. Enabling the
 button will solo the selected Chain, playing only its audio.
- Gain 1/2: Post volume gain of the sub-chains.
- Frequency: (Frequency Type only) The point of separation between the Low and High ranges.
Tips and Tricks
- The Frequency parameter can be automated, making it a powerful creative tool.
- Meta devices can work across sub-chains, allowing the user to modulate or control parameters in the opposing effect chain.
- Doofers can contain other Doofers, and Splitters can do the same. This allows the audio signal to be split off into multiple nested layers, each affecting the audio in different ways and passing it on to the next split layer.
Notepad
The Notepad is an incredibly simple device used to write notes and place them within effect chains. You may perhaps use them to remind yourself, or inform others, of the functionality of a particular effect chain. They come in especially handy for Doofers and Splitters where effects are often minimised and short device names may not be informative enough.
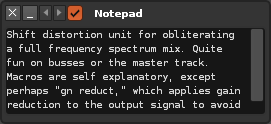
To write notes, simply click in the text field and start typing. Text editing can be prevented by disabling the device.


